Samstag, 28. Juni 2014

Stempeleinmaleins - Ausgabe vom 28. Juni 2014


Hallo Ihr Lieben!
Wie jeden letzten Samstag im Monat startet auch heute eine neue Challenge beim Stempeleinmaleins. Mit einem neuen Sketch und der Option "am Strand".

Hello everyone!
Like every last satuday of the month the new challenge at Stempeleinmaleins goes live today also. With a new sketch to follow and the option of a beach theme.

Ich habe nach dem Sketch die Geburtstgskarte für meine Mutter gemacht. Sie ist 66 geworden - und es gibt da ja dieses Lied "mit 66 Jahren, da fängt das Leben an"... Passend dazu habe ich dann die Mäuse von Lili of the Valley verwendet, die es ja wirklich verstehen, das Leben zu genießen.

I used the sketch to maky my mom's birthday card. She turned 66 end of may - and there is a german song that's goes like "when you're 66 years old life really starts"... So matching this I created the start of the song for the saying and went with these cute mice by Lili of the Valley that really seem to know how to enjoy live.


Ich habe die Flaschen mit Glossy Accents überzogen und Stickles auf den Champagner und die Silberteile wie den Sektkühler aufgetragen.

I covered the bottles with Glossy Accents and added some Stickles to the champagne and the silver parts like the cooler.

Meine Mutter liebte die Karte... und die Flasche Champagner, die es obendrauf gab um die Sache mit der Pyramide gleich mal zu probieren, hat auch nicht lange überlebt... ;)

My mom loved this card... and the bottle of champagne that we gave her to try out the champagne pyramide didn't live long... ;)

Habt einen tollen Tag!
Have a great day!


Mittwoch, 25. Juni 2014

Whiff Of Joy Challenge # 182


Hallo Ihr Lieben!
Es ist Zeit für die neue Whiff Of Joy Challenge! Diesmal mit dem Thema "Use a Digi". Zeit, mal wieder das Freebie, das es letztes Jahr gab, auszudrucken...

Hello everyone!
It's time for a new challenge at  Whiff Of Joy. This fortnight our theme is "use a digi". Just the time to print out the free digi that was available last fall...

Ich habe hier das Stifte-Etui nach der Anleitung der Schnipselchen gewerkelt - passend zum Motiv. Und farbenfroh musste es natürlich sein. 
Das Wort COLOR auf der Banderole habe ich mit dem Alphabeth Die-Light Set ausgestanzt, darunter dann the world, gestempelt mit kleinen Buchstabenstempeln und rund ausgestanzt. Gerade eben, dass sie draufgepasst haben. 
Außerdem habe ich aus der Box of Charms Nr. 9.
Auf das Designpaper des Etuis habe ich noch ein paar kleine Worte gestempelt und oben zur Deko zwei Knöpfe angebracht.

I made a pen holder following the tutorial by Schnipselchen - matching the image. And of course it needed to be colorful.
The word COLOR on the wrapper has been cut using the Alphabeth Die-Light Set, underneath I put the words "the world" that were stamped using small letter stamps and punched out with a small round punch. They just fit the front of the wrapping.
I also added a scissors and a ruler charm that both can be found in the Box of Charms # 9.
I stamped some words on the designer's paper and added two buttons to the flap.


Samstag, 21. Juni 2014

Stempeleinmaleins - Ausgabe vom 21. Juni 2014

Hallo Ihr Lieben!
Heute ist Sommeranfang -  und passend dazu zeigen wir Euch heute beim Stempeleinmaleins diese Flip-Flop-Karte von den Schnipselchen.

Hello everyone!
Today it's the first official day of summer and so we at Stempeleinmaleins show you this Flip Flop Card by Schnipselchens today.


 Ich habe für meine Karte das Digi-Motiv Lazy Summer Days von Whiff Of Joy verwendet - der Junge in der Hängematte passt einfach prima zu einem heißen Sommertag. Die Aufhängungen der Hängematte habe ich abgeschnitten und mit Kordel nachgemacht.
Den Text auf den Wimpeln seitlich kann man leider nicht so toll lesen, das nächste Mal embosse ich ihn. 
Der Hintergrund der Flip Flops ist mit hellblauem Papier überzogen, den ich mit kleinen Sternen, Heißluftballons sowie einigen Texten bestempelt habe. 
Oben an der Schleife habe ich noch ein T-Shirt Charm angebunden.

I used the Digi image Lazy Summer Days by Whiff Of Joy for my card - this boy and his dog look like they are resting on a hot summer day. I cut off the ropes from the hammock and re-build them from twine.
The saying on the banners at the right side are hard to read on the photo. I will heat emboss them next time I guess.
The background of the flip flops has been made from light blue designer's paper that I stamped little stars, hot balloons and  few words on.
To the bow on the top I added a shirt charm.


Samstag, 14. Juni 2014

Stempeleinmaleins - Ausgabe vom 14. Juni 2014


Hallo Ihr Lieben!
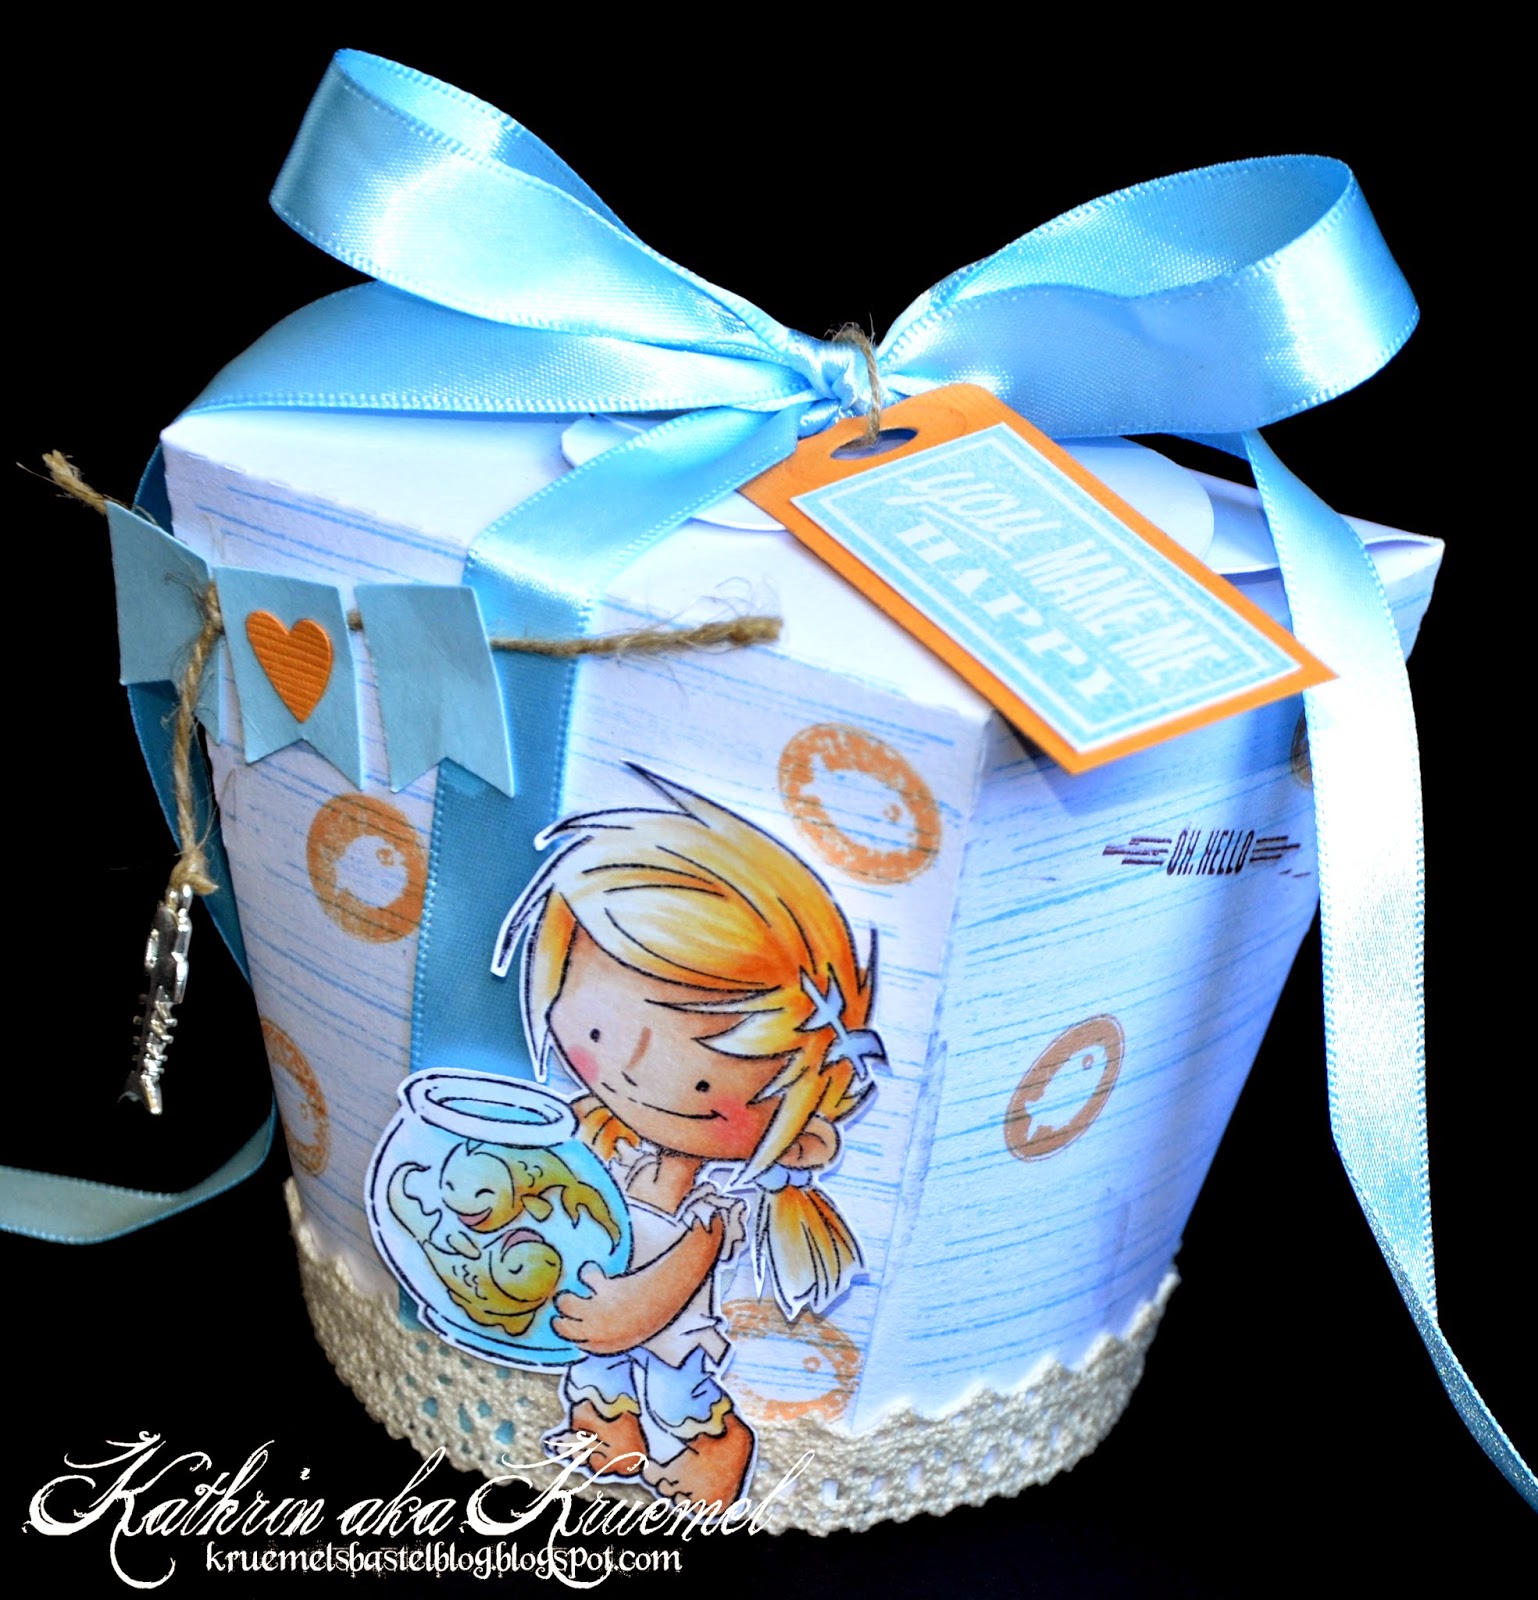
Auch heute gibt es, wie jeden Samstag, eine neue Ausgabe des Stempeleinmaleins. Diesmal mit einer Anleitung für diese Chinabox. Das besondere daran ist, dass sie unten rund und oben eckig ist. Das Template könnt Ihr Euch im Post runterladen.

Hello everyone!
Also today, like every saturday, there is a new issue of Stempeleinmaleins. This week's tutorial is for how to make this china box. Special about this one is that it is round on the bottom and rectangle on the top. The template can be downloaded in the posting.

Zum Dekorieren habe ich die süße Fische-Maya von Whiff Of Joy verwendet. Die Box an sich habe ich mit feinen Streifen und weiteren Fischen bestempelt. So passt das alles prima zusammen, denn gefüllt ist sie mit kleinen Gummibärchen-Fischen...

To decorate the box I went with this cute Pisces Maya by Whiff Of Joy. The box itself has been stamped with fine lines and more fish. Now everything matches because the box is filled with gumbear fish...


Auch seitlich und auf der Rückseite habe ich Fische sowie den Text "Oh Hello" gestempelt. 
Etwas Spitze, eine kleine Fähnchen-Girlande mit einem Fischgräten Charm aus der Box of Charms Nr. 5 - alles für Jungs - ergänzen die Deko.

Also the sides and back of the box got some fish and several times the saying "oh hello" stamped on.
Some lace, a small garland and a fish charm from the Box of Charms Nr. 5 - all for the boys - complete the decoration.


Zum Verschließen habe ich ein Bnd rund um die Box gewickelt und oben zur Schleife gebunden (die Box hat aber einen Verschluss eingebaut, so fand ich es einfach optisch schöner). An der Schleife habe ich dann noch einen Tag mit dem Text "you make me happy" angebracht. Der Text ist in hellblau gestempelt und ich denke, wenn man aufs Bild klickt, kann man ihn auch lesen. ;)

To close the box I wrapped some ribbon all around the box and tied it to a box on top (the box itself has a closure but I just liked the bow on top). I added a tag to the bow that has the text "you make me happy" stamped on it. I stamped the saying in a light blue color but I think if you click on the picture you'll be able to actually read/see it. ;)


Freitag, 13. Juni 2014

Whiff Of Joy Challenge # 181


Hallo Ihr Lieben!
Oh Mann, vor lauter Hitze die letzten Tage habe ich vollkommen vergessen, Euch mein Werk für die neue Whiff Of Joy Challenge zu zeigen! "Flowers" ist das Thema.

Hello everyone!
Oh well, due to the bad heat outside the last days I totally forgot to share my creation for our newest Whiff Of Joy Challenge! Our theme is "flowers".

Ich habe "Eine Schürze voll Blumen" aus der Simply Maya Reihe verwendet, sie coloriert und nur Maya, ohne die Pflanze daneben, ausgeschnitten. Dann habe ich sie auf eine Samentütchen-Verpackung geklebt. Mit ein wenige Deko drumrum ist so ein schnelles kleines Geschenk entstanden. Für die Verpackung habe ich das Stifte Etui der Schnipselchens etwas abgewandelt.

I used "apron full flowers" from the Simply Maya range here, colored her in and only cut out Maya - without the plant beside her. Then I put her on a seed pocket gift. With some decorating around a little gift was made very quick. 
For the pocket I slightly changed the Pen Holder by the Schnipselchens.


Auf der Rückseite befindet sich noch ein passender Spruch.

On the backside I added a matching text.


Und so sieht die Verpackung dann geöffnet aus.

And this is what the pocket looks opened.


Samstag, 7. Juni 2014

Stempeleinmaleins - Ausgabe vom 07. Juni 2014


Hallo Ihr Lieben!
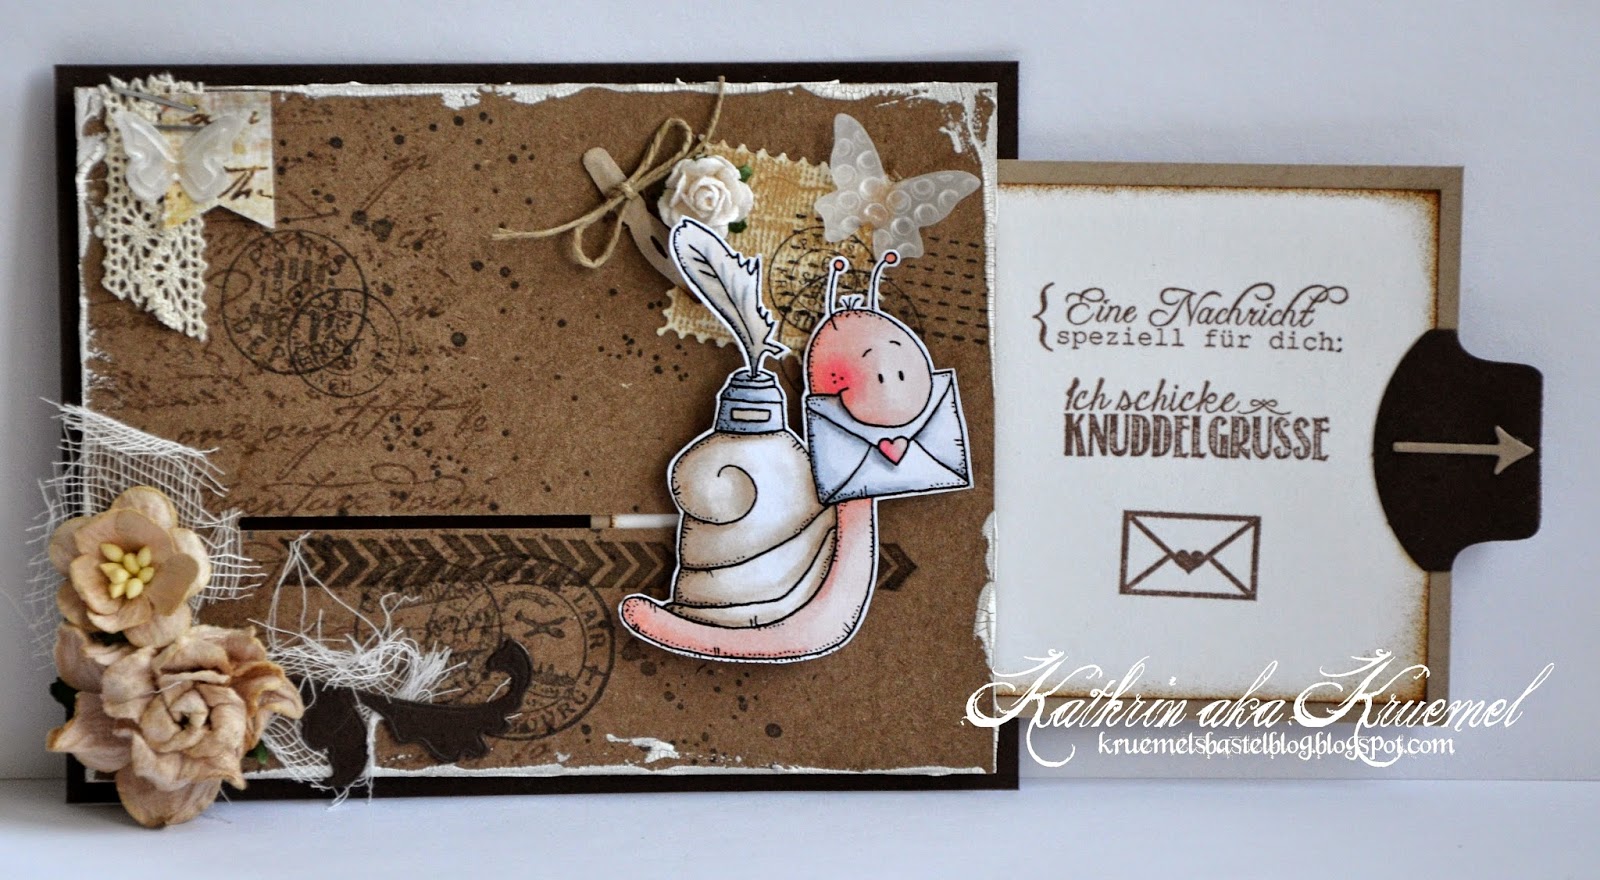
Es ist Samstag und somit Stempeleinmaleins-Tag! Heute haben wir eine Anleitung für diese Ziehkarte für Euch.

Hello everyone!
It's saturday and that means it's the day of Stempeleinmaleins. Today we share how to make this pull tab slider card.

Die Karte finde ich prima, denn sie hat einen "Effekt" und solche Karten finde ich immer besonders toll. Wenn Ihr nämlich an dem Tab rechts zieht...

I love this card because it has a "feature" build in and I love those types of cards. If you pull the tab on the right...


...wandert die Schnecke auf der Karte nach rechts und der Gruß kommt zum Vorschein!

...the snail wanders to the right of the card and a saying can bee read!

Die Schnecke ist natürlich von Lelo. Mein "Schneckenpost"-Stempel war leider für das Innenleben zu groß, das hätte dann noch besser gepasst. So habe ich aber diese Texte von Whiff Of Joy verwendet und die passen auch prima.
Beim Dekorieren der Karte muss man nur aufpassen, dass die Schnecke - oder welches Motiv auch immer - noch problemlos auf der Karte hin und her wandern kann und nicht irgendwo hängen bleibt. 

The snail is by Lelo Design. I wanted to use a "snail mail" stamp on the inner panel but it was too large and so I went with these sayings by Whiff Of Joy that also match the design. It says "a message especially for you" and "I am sending hugs".
If you decorate the card you have to take care that the snail - or what image ever you use - can slide free on the card and is not getting stopped by any embellishment.

Und hier habe ich noch eine zweite, einfach gehaltene Karte nach dem selben Prinzip gemacht, nur um zu zeigen, dass man den Schlitz natürlich auch senkrecht nutzen kann:

And here I have a second, pretty simple card using the same technique, just to show that it also works with a vertical slit:


Die Wolken auf der Vorderseite habe ich mit aufgedoppeltem Abstandsband angebracht, so kann sich Tilda ganz einfach dahinter verstecken.

The clouds on the front were put on using double 3D tape so Tilda can hide behind.

Und gerade sitze ich schon an der nächsten Version. Eine Geburtstagskarte für meine Nichte zum 2. Geburtstag. Kinder lieben es einfach, wenn sich auf den Karten etwas tut. Ich zeige sie Euch, wenn sie fertig ist!

And at the moment I am working on another of these cards. A birthday card for my niece's 2nd birthday. Kids just love if the can "use" the card. I will share it once it is done!


Dienstag, 3. Juni 2014

Magnolia Down Under Challenges # 237


Hallo Ihr Lieben!
"Keine quadratischen oder rechteckigen Karten" - so lautet das Thema für unsere neue Challenge bei Magnolia Down Under...

Hello everyone!
"No square or rectangle cards" is the theme for our new challenge over at Magnolia Down Under...

Und so ist diese Karte entstanden.
Ich wollte endlich eines der Sternzeichen-Motive verwenden - und da kam mir die Idee mit dem Schützen und der Zielscheibe. Die habe ich aus roten und weißen Ringen ausgestanzt und den mittleren Ring durch ein rotes Herz ersetzt. Und Tilda zielt genau "ins Schwarze". 
Der Text dazu ist von SU. Und als Deko habe ich Spitze, Federn, etwas Cheesecloth, ein Stanzteil und Blumen verwendet. Ich habe bewusst nur die eine Seite der Karte dekoriert damit man die Zielscheibe auch noch erkennen kann.

And so I made this round card.
I finally wanted to use one of the zodiac images - and then got the idea of the Sagittarius and the target. The target has been made using white and red rings of cardstock, as the bull's eye I used a red heart instead a circle. And Tilda is exactly targeting the bull's eye.
Saying is by SU. As embellishments I went with lace, feathers, some cheesecloth, a punched out border and flowers. I only decorated one side of the card so you could still see the target.

Coloriert habe ich mit Copics:
Coloring has been done with Copics:


Samstag, 31. Mai 2014

Stempeleinmaleins - Ausgabe vom 31. Mai 2014


Hallo Ihr Lieben!
Immer am letzten Samstag im Monat gibt es beim Stempeleinmaleins eine neue Challenge mit einem Sketch für Euch. Und diesmal fällt die Challenge sogar auf den allerletzten Tag im Mai...

Hello everyone!
Every last saturday of the month we at Stempeleinmaleins have a new challenge with a sketch for you. And this month it even starts on the very last day of the month...

Alle paar Wochen treffen sich ungefähr 10 grandiose Mädels zum gemeinsamen Basteln und Quatschen. Vor einiger Zeit haben wir begonnen, Rezeptkarten auszutauschen. Jedes Mal macht ein anderer eine Rezeptkarte für alle Mädels. Und diesmal war ich dran. Und so habe ich den Sketch genutzt, um die Rezeptkarten danach zu werkeln. 

Every few weeks there are 10 amazing ladies meeting to have some fun while crafting and chatting together. Some time ago we started a recipe card swap. Every time we meet another lady brings recipe cards for all the others. And this time it was my turn. So I used the sketch to make my recipe cards.

Die Lelo-Schnecke war einfach perfekt - auch wenn ich ein Fleisch-Rezept geteilt habe und die Schnecke Plätzchen auf dem Haus transportiert. Aber dieses Fleisch hatte ich den Mädels bei einem Treffen bei mir mal aufgetischt und alle hatten nach dem Rezept geschrien...
Und so habe ich zum Ausgleich das Besteck von Whiff Of Joy mit auf die Karten gepackt, zusammengebunden mit etwas Twine und unterlegt mit einem Tortendeckchen.
Der Freundschafts-Hintergrund ist ein Stempel von SU, das Lecker stammt aus einem Textset von Whiff Of Joy.

This snail by Lelo was perfect for my recipe cards - even if I shared a meat dish and the snail is transporting cookies on her house. But I cooked this Slow-Cooker dish once when we all met in my house and everyone wanted the recipe...
And so I used the fork and knife by Whiff Of Joy to make the card give a more main dish look, added some twine and put a doily underneath.
The friendship stamp in the background is by SU, the small words, meaning yummy, are from a german text set by Whiff Of Joy.


Auf dem Foto oben seht ihr, warum meine Rezeptkarten blau ausgefallen sind: die in den USA gekauften Rezeptkarten hatten einen blau-weiß karierten Streifen...

On the picture above you see why I've chosen blue as the color for my recipe cards: those plain recipe cards bought in the USA had a blue and white checked strip...


Und um zumindest ein klein wenig Abwechslung reinzubringen, habe ich die Papiere ein wenig ausgetauscht. Es gab also 5 Karten, wie ganz oben im Post zu sehen, und 5 wie die hier direkt darüber.

And to bring in at least a little change I switched papers a bit. So there were 5 cards made like the ones shown on the picture on top of this post and another 5 cards looking like this one.

Coloriert habe ich mit Copics:
Coloring has been done with Copics:


Mittwoch, 28. Mai 2014

Whiff Of Joy Challenge # 180


Hallo Ihr Lieben!
Heute startet die neue Challenge bei Whiff Of Joy. Unser Thema lautet diesmal "for the boys".

Hello everyone!
Today the new challenge at Whiff Of Joy goes live. Our theme for this fortnight is "for the boys".

Ich habe für meine Karte den "Segelausflug" ausgewählt.Ich hatte genau die passenden Papiere dazu zur Hand...
Der Text ist aus dem Set "Piraterie".
Die Wimpelkette habe ich mit dem Die-Light-Set "Kleine Banner" gemacht.
Und zur Deko habe ich einen Kronkorken, verziert mit einer kleinen Flasche und zwei Charms aus der Box of Charms Nr. 7 - Piratenschatz - angebracht.

I picked this cute sailor for my card. I had the exactly matching papers at hand.
Saying is from the german text set "Piraterie".
The banner has been made using the die-lights set "little banners".
And for the decoration I flatened a bottle cap und decorated it with a little bottle and two charms from the Box of Charms No 7.

Coloriert habe ich mit Copics, leider ohne Bild mit den verwendeten Stiften diesmal...
Coloring has been done with Copics but I didn't take a picture of the markers I used...


Samstag, 24. Mai 2014

Stempeleinmaleins - Ausgabe vom 24. Mai 2014


Hallo Ihr Lieben!
Heute zeigen wir Euch beim Stempeleinmaleins, wie Ihr diesen Picknickkorb werkeln könnt. Die Anleitung ist von den Schnipselchens und wie immer super genial und detailverliebt.

Hello everyone!
Today we at Stempeleinmaleins share a tutorial for this cute picnic basket.  Schnipselchens have made the tutorial and the design is as genius and full of details as always.

Ich habe die süße Tilda vom Strand auf eine Wiese "versetzt" und nun passt sie wunderbar auf den Korb. Ein paar Blümchen drumrum ergänzen die Szene dann. 
Den Korb habe ich rundum mit gekräuselter Spitze besetzt und ein paar Banner am Rand angebracht. 

I let this cute Tilda leave the beach and sit down in a meadow and now she's the perfect choice for this basket. A few flowers around her complete the scene.
I put ruffled lace all around the brim of the basket and added a few banners under it.


Oben auf dem Deckel habe ich einen kleinen Text und einen relativ großen Schmetterling aufgesetzt. 

On top of the basket I put a saying and a quite big butterfly.


Die Griffe zieren ein Kirschencharm und ein silberner Tag mit Herzausstanzung, die ich  mit rotem Cardstock hinterklebt habe.
Eigentlich wird der Korbdeckel ja fest verklebt verschlossen und dann aufgerissen. Mir tat es aber irgendwie weh, den Deckel "zerstören" zu müssen und daher habe ich links und rechts einen Streifen aus braunem Cardstock aufgesetzt, der mit einem Stück Klett verschlossen wird. So kann der Deckel immer wieder geöffnet und geschlossen werden.
Die Seiten habe ich dann jeweils mit einem kleinen Fähnchen verziert.

The handles are decorated with a cherry charm and a silver metall tag with a cut out heart that I put some red cardstock behind. 
The original idea is to close the lids with glue and then tear it open. But it hurts my heart to see this getting kind of destroyed and so I added a strip of brown cardstock to each side of the lid that gets closed with a piece of velcro. So it can be opened and closed as many times as wanted.
The sides of the basket got decorated with a little banner as well.


Mittwoch, 21. Mai 2014

A Whiff Of Joy Wednesday Die-Light


Hallo Ihr Lieben!
Heute zeige ich Euch auf dem Whiff Of Joy Blog eine Karte im Rahmen unserer Wednesday Die-Lights. Die-Lights sind die Stanzen von Whiff Of Joy, und immer mittwochs zeigen wir Euch eine Karte, die ohne gestempeltes Motiv auskommt, stattdessen nur mit Die-Lights gestaltet ist.

Hello everyone!
Today I am sharing a wednesday die-light over the Whiff Of Joy Blog. Die-Lights are the cutting dies by Whiff Of Joy, and every wednesday we share a card that has no stamped image on but is made using those Die-Lights only.

Und so ist diese sommerliche - oder auch frühlingshafte - Schmetterlingskarte entstanden. Sieht doch auch mal hübsch aus, so ohne Stempelmotiv. Irgendwie edler.
Alle weiteren Informationen zu dieser Karte findet Ihr HIER in diesem Post.

And so this summer-ish - or even spring-ish - butterfly card got done. I think it looks pretty, even without a stamped image. To me it looks very more elegant.
More informations about my card can be found in THIS POST over at the Whiff Of Joy Blog.


Sonntag, 18. Mai 2014

Ein Tutorial auf dem Copic Marker Europe Blog


Hallo Ihr Lieben!
Hier bin ich schon wieder...
Diese Karte könnt Ihr heute auf dem Copic Marker Europe Blog sehen - zusammen mit einem Tutorial für den Unterwasser-Hintergrund.

Hello everyone!
Here I am back again...
This is the card that I made for my post over at the Copic Marker Europe Blog today - and I also have a tutorial there for how to make the underwater background.


Der Stempel, den ich verwendet habe, ist der Wassermann Stempel von Whiff Of Joy. Ich finde ihn so süß - und es muss ja nicht immer die klassische Meerjungfrau sein. 
Als Kartenform habe ich mich hier für eine Centerstep Karte entschieden. Die hebt das Motiv so toll in den Vordergrund.
Als Deko habe ich nur etwas Cheesecloth benutzt, das so toll wie Fischernetz aussieht, und ein paar Perlen darauf geklebt. Dazu ein ausgestanzter Anker, einen Text von Catslife Press, ein paar Unterwasserpflanzen - ausgestanzt mit der Ranken-Stanze von Whiff Of Joy - und eine echte Flaschenpost...

The stamp I used is the Aquarius stamp by Whiff Of Joy. I think this is so cute and I love to use something different than the usual mermaid images.
I made a center step card here. Love how these keep the focus on the image.
As decoration I just went with some cheesecloth that looks so wonderfully like a fisher net and added  few pearls to it. I also used a punched out ancor, a saying by Catslife Press, a few underwater plants - cut using the Twiner cutting die by Whiff Of Joy - and a real message in a bottle...


Die Flasche habe ich mit goldfarbenem Glitter als Sandersatz gefüllt und dann natürlich die Nachricht zusammengerollt hineingepackt.

The bottle was filled with some golden glitter as sand and of course with the rolled up message.


Samstag, 17. Mai 2014

Stempeleinmaleins - Ausgabe vom 17. Mai 2014


Hallo Ihr Lieben!
Es ist Samstag - und somit Stempeleinmaleins-Zeit! 
Diese Woche zeigen wir Euch wie Ihr diese File-Folder-Card machen könnt. Entweder ganz "herkömmlich" oder aber extra fix mit dem Envelope Punch Board.

Hello everyone!
It's saturday - time for Stempeleinmaleins!
This week we share how to make this file folder card. Either the "common" way or a quicker version with the Envelope Punch Board.

Ich habe damit diese Rezeptkarte bzw. deren Verpackung gebastelt. Dazu habe ich die süße Tilda mit dem Spritzbeutel verwendet. Seit langem zur Abwechslung mal wieder mit Prismacolors coloriert, die sollen ja nicht total einstauben. 
Verziert ist der Umschlag mit zwei Charms, etwas Spitze und einem Knopf. 

I made this recipe card or better the envelope for one. Therefor I went with this cute Baking Tilda. And since a long time I used my Prismacolors to color her in, I don't want those to collect too much dust.
I used two charms, some lace and a button to decorate the envelope.


Die Rezeptkarte selbst habe ich mit einem Set von SU gestaltet. Die Yum Scale finde ich einfach genial!

The recipe card itself has been made using a set by SU. I love the Yum Scale stamp!


Mittwoch, 14. Mai 2014

Whiff Of Joy Challenge # 17


Hallo Ihr Lieben!
Es ist wieder Zeit für eine neue Whiff Of Joy Challenge! Unser Thema für die nächsten beiden Wochen lautet "Shabby Chic".

Hello everyone!
Time for  new Whiff Of Joy Challenge! Our theme for the next two weeks is "shabby chic".

Mir war mal wieder nach etwas anderem als "nur" Karte. Und so habe ich diese Menükarte mit Tasche erstellt. Die Tasche war mit dem Grosses Nested Tag Die-Light ganz schnell gemacht, für das Innenleben habe ich dann einfach die nächst kleinere Größe verwendet.
Dekoriert ist die Tasche mit einem halben Spitzendeckchen, auf das ich Messer und Gabel aus dem Die-Light-Set "Besteck" aufgesetzt habe.
Den Hintergrund habe ich mit dem Clearstamp Set Basis Hintergründe Text bestempelt. Und ich musste auch mal wieder die schon recht alten aber dennoch wunderschönen Erdbeeren verwenden. Ich habe sie auf kraftfarbenen Cardstock gestempelt und mit meinen Prismacolor-Stiften ganz leicht coloriert.

I wanted to do something else than "just a card". And so I made this menu holder. The holder was made in like no time using the Big Nested Tag Die-Lights. And for the inner card I used the next smaller Die-Light.
The holder is decorted with half a doily that I put knife and fork on, cut using the Cutterly Die-Lights set. 
The background has been stamped with the Essential Background Text Style clear stamps. And I also had to use those - quite old - strawberry stamps. I stamped those on craft cardstock and used my Prismacolor pencils to just lightly color them in.


Natürlich ist auch die innere Karte verziert - mit ein paar Schnörkeln und dem Text Mahlzeit, den Ihr im Stempelset Kalorienreich finden könnt.

Of course also the inner card got some stamping on it - I added a few flourishes and the word Mahlzeit which can be found in the german text set Kalorienreich.


Samstag, 10. Mai 2014

Stempeleinemaleins - Ausgabe vom 10. Mai 2014


Hallo Ihr Lieben!
Beim Stempeleinmaleins zeigen wir Euch heute eine Anleitung für eine Pocketfold Karte.  Die ist Umschlag und Karte in einem...

Hello everyone!
Our new tutorial at Stempeleinmaleins is showing you how to make a pocketfold card. It's card and envelope all in one...


Damit ich die Karte auch wirklich versenden kann, habe ich sie recht einfach gehalten, damit beim Versand auch nichts abreißen kann. Vorne habe ich die Postkarte von Whiff Of Joy aufgestempelt.

To be able to really send out the card as it is I made it quite simple so no parts get ripped off during transport. On the front I stamped the postcard image by Whiff Of Joy.


Die Lasche auf der Rückseite ziert ein Label von SU, das mit einem Stück Klettverschluss gehalten wird. Zum Versenden werde ich mir da wohl etwas anderes einfallen lassen...

The flap on the back is decorated with a label by SU, underneath I put a piece of velcro to close it. I think I have to think about something else for shipping though...


Klappt man die Karte dann auf, ist in der Mitte Platz für einen Text - hier mit einem Rahmen aus den neuen Blättern von Magnolia verziert.
Und darunter ist eine Tasche. Die habe ich mit weißen Herzen bestempelt, eine Bordürde darauf gesetzt und darüber sitzt diese süße Tilda.

If you open up the card there's room for a text in the middle of it - here decorated using those new leave corners by Magnolia.
And then there is also a pocket. I stamped white hearts all over it, added a border and sat this Tilda cutie on top.

Hier eine Nahaufnahme:
Here's  a close-up:


Die Tasche ist noch leer, denn ich weiß noch nicht, wer die Karte bekommt. Aber durch die wenigen Verzierungen auch innen, bleibt die Karte/das Kuvert nach dem Verschließen schön flach.

The pocket is still empty because I haven't decided yet who to send this card to. But with the few to none embellishments inside the card/envelope stays pretty flat for shipping.