Dienstag, 18. April 2023

You make me Smile

 Hallo Ihr Lieben!
Kennt Ihr das - Ihr habt Stempel einer gewissen Firma seit langem nicht mehr verwendet und sie dann plötzlich für Euch wieder entdeckt? So geht es mir momentan mit MamaElephant. Und so zeige ich heute eine weitere Karte mit den süßen Motiven dieser Marke.

Hello everyone!
Does this happen to you, too - you  haven't used the stamps of a brand for quite a long time, and then you re-discover them? That's what happening with MamaElephant for my right now. And so I am sharing another card with some of their cute images today.

Das hier ist - bis auf die Mattung und das aufgeklebte Smile - tatsächlich auch noch eine One Layer Card. Schneller ging sie deswegen aber auch nicht...

This is - except for the mat and the die cut word smile - also a One Layer Card. But that doesn't mean it was done quicker than the cards I usually make...


Ich habe zuerst die beiden Tierchen aus dem Set Flower Friends mit Jellyfish Ink von LawnFawn auf den weißen Cardstock gestempelt, sie dann mit Masking Tape abgedeckt und die Blätter aus dem Set Wild Meadow mit derselben Stempelfarbe dahinter gesetzt. Außerdem habe ich noch das kleine Bienchen aufgestempelt.
Anschließend habe ich alle Motive mit Copics coloriert und die Stiele der Pflanzen mit Polychromos hinzugefügt. Der leicht grüne Boden und das blau im Hintergrund sind dann wieder mit Copics gemacht.
Ich habe die Masken wieder auf die Tiere geklebt - diesmal auch das Bienchen -, den unteren Teil der Karte abgedeckt und auf die Pflanzen ganz feine Spritzer weißer Metallic Watercolor aufgetragen. Ich finde, gerade über Pflanzen gibt das immer einen etwas verträumten Look. 
Zum Schluss habe ich noch das You Make Me, ebenfalls aus dem Set Flower Friends, schwarz unten rechts auf die Karte gestempelt und ein gestanztes smile daneben gesetzt. Das ist mit einer Stanze aus dem Set Selfie Frames von LawnFawn dreimal aus schwarzem Cardstock gestanzt und aufeinander geklebt. Rechts neben den Text habe ich noch ein kleines rosafarbenes Herz aufgebracht.

First I stamped the two critters from the set Flower Friends onto white cardstock using LawnFawn's Jellyfish ink, then covered them with masking tape and stamped the leaves from the Wild Meadow set behind them using the same ink. I also stamped the little bee into the sky.
Then I colored all images with Copics and used Polychromos for the stems. The soft green ground and the blue sky are again made with Copics.
I put the masks back onto the critters - this time also one onto the bee -, covered the bottom of the cardstock with some copy paper and added very fine splatters of white metallic watercolor over the plants. To me those always add a dreamy touch to a scene, especially over plants.
Then I stamped the You make me, again from the Flower Friends set, black to the bottom of my cardstock and adhered a die cut smile next to it. I've cut that using a die from the Selfie Frames die set by LawnFawn, cut three times from black cardstock and stacked up. Next to the text I added a small pink heart.


Um die Karte fertigzustellen, habe ich den Cardstock mit den Motiven nur noch schwarz gemattet und alles auf einen weißen Kartenrohling geklebt.

To finish the card, I only matted the cardstock with the images black and attached it to a white note card.

Montag, 17. April 2023

Geburtstagskarte mit Hamstern

 
Hallo Ihr Lieben!
Heute habe ich eine Geburtstagskarte für Euch, bei der der Hintergrund der Ausgangspunkt war. Alles andere habe ich dann drumherumg aufgebaut.

Hello everyone!
Today I have a birthday card to share, that started with the background. Everything else I created around it.

Im Hintergrund habe ich einen Marmorlook gold auf weißen Cardstock foliert. Eigentlich war der für eine komplett andere Karte gedacht. Aber dann kam ich auf die Idee, den Cardstock mit Distress Ink Lost Shadow, Hickory Smoke und Black Soot zu wischen - und für die andere Karte, die ich Euch noch nicht zeigen kann, hat das dann doch so überhaupt nicht gepasst. Also habe ich einen neuen Hintergrund gemacht - und dieser hier blieb übrig. 
Außerdem lag auf meinem Tisch noch ein weißes Stanzteil, gemacht mit der Curly Q Stanze von Tailored Expressions. Na, das könnte ich doch bei der Gelegenheit auch gleich verarbeiten... Ich habe die Luftschlangen mit Copics in gedecktem Grün und Türkis coloriert und anschließend einen gestitchten Rahmen, gestanzt aus goldenem Spiegelcardstock, aufgeklebt.

For the background I had gold hotfoiled a marble look onto white cardstock. I had made this for a different card. But then I had the idea, to ink the cardstock with Distress Ink Lost Shadow, Hickory Smoke and Black Soot - and didn't like that at all for that other card, that I can't share with you yet. So I created a new background - and this one was left over.
I also had a white die cut, made with the Curly Q die by Tailored Expressions, left on my table. Well, while I was at it, why not use up another piece that's waiting to be used... I colored the streamers in muted green and aqua with my Copics and then glued a stitched frame, die cut from gold mirror cardstock.


Nun brauchte meine Karte natürlich auch ein Motiv. Ich habe den Conga Line Stempel von ColoradoCraftCompany abgestempelt, dann aber nur den ersten und letzten Hamster verwendet. Ich habe sie ausgeschnitten und aneinander geklebt. Eigentlich hat der rechte Hamster noch eine Luftschlange im Mund, was ja perfekt gepasst hätte. Aber die war einfach viel zu lang, also habe ich sie weggeschnitten bzw. Schnurrhaare daraus gemacht.
Ich hatte einige Zeit überlegt, wie ich die Hamster colorieren sollte - und mich dann entschieden, sie bis auf leicht gerötete Nasenspitzen und Backen, weiß zu lassen. Im Hintergrund ist schon so viel los, das wäre alles zu viel geworden. Also habe ich sie quasi uncoloriert mit 3D Tape auf die Karte geklebt. 
Um das helle rosa zumindest nochmal ein klein wenig zu wiederholen, habe ich rund um das Motiv fünf kleine hellrosafarbene Herzen verteilt.
Und auch die Texte waren Rest von jener Karte, für die ich den Hintergrund eigentlich geplant hatte. Ich wusste im Vorfeld nicht, welcher Text dort am besten passt, und habe vorsichtshalber mehr als einen gold auf schwarzen Cardstock foliert und eine Hotfoil Plate von Kartenkunst verwendet. Einen der übriggebliebenen Textstreifen habe ich quer über die Karte und einen Teil des Motivs geklebt.

Well, my card needed an image. I stamped the Conga Line image by ColoradoCraftCompany, and then only used the first and last hamster in line. I cut them out and attached them to each other. The hamster on the right has a streamer in his mouth - what would have gone perfectly with the card. But it was way too long, so I cut it off - and made the whiskers from them.
I had thought some time about what colors I wanted to use for the hamsters - and then decided, to not color them at all! Well, except for some light pink cheeks and noses. There's so much happening in the background already, colored images would have been too much. So I attached them nearly uncolored to the card using foam tape. To pick up the soft pink at least a bit, I added five light pink hearts around the images.
And also the texts were left overs from the card, that I originally had made this background for. I wasn't sure which text I wanted to use on that card and so I hotfoiled a few with gold foil onto black cardstock using a hotfoil plate by Kartenkunst. One of the let over text strips I attached across the card and part of the images.


Hier kann man die Folierungen nochmal besser sehen - in echt wirkt die Karte auch längst nicht so düster wie auf den Bildern.
Oben über die Luftschlangen habe ich einen zweiten Streifen mit auffoliertem Text aufgeklebt und dann alles auf einen weißen Kartenrohling montiert.

Here you can see all the foiling better - and in real life, the card isn't as dark as it looks on the pictures.
Across the streamers, at the top of the card, I adhered a second cardstock strip with a foiled on text, then attached everything to a white note card.

Sonntag, 16. April 2023

Cheers to you

 
Hallo Ihr Lieben!
Heute zeige ich Euch eine Karte, die mit einem Hintergrund gestaltet ist, der eigentlich für eine andere Karte gemacht war. Da passte er dann aber doch nicht - also habe ich ihn hierfür weiterverarbeitet.

Hello everyone!
Today I am sharing a card, that I made using a background, that I had planned for a different card. But it didn't fit that one - and so I changed it and used it for another card.

Ursprünglich war die Karte als Geburtstagskarte geplant, aber wenn ich sie mir jetzt so anschaue, passt sie für verschiedene Gelegenheiten.
Für besagten Hintergrund habe ich ein Stück weißen Cardstocks mit Distress Oxide Kitsch Flamingo, Picked Raspberry, Lumberjack Plaid und ein wenig Aged Mahogany gewischt und etwas Wasser aufgespritzt. Soweit war der Hintergrund für die  andere Karte - die ich Euch noch nicht zeigen kann - schon gemacht. Für diese Karte habe ich dann einen Strahlenstencil von MFT aufgelegt und die Strahlen mit dem Yeti Stempelkissen von LawnFawn aufgewischt. Dann habe ich noch hell-goldene Metallic Watercolor aufgespritzt.
Aus schwarzem Cardstock habe ich das Cheers mit der Cheers Stanze von MFT ausgestanzt und soweit oben wie möglich auf den Cardstock geklebt. 

Originally I had planned to make this a birthday card, but when I look at the finished card now, I see, that it fits all different kinds of occasions.
For said background I inked up a piece of white cardstock with Distress Oxide Kitsch Flamingo, Picked Raspberry, Lumberjack Plaid and a bit Aged Mahogany and then flicked some water on top. This was what the background looked like that I had planned for the other card - that I can't show you yet. For this card I then put a sunrays stencil by MFT onto the cardstock and inked the rays with the Yeti ink by LawnFawn. Then I flicked some light gold met
allic watercolor on top.
From white cardstock I cut the cheers using the Cheers die bby MFT and attached it as close as possible to the top edge of the background.


Die Drinks sind alle mit den Stanzensets Longstem Barware, Barware Basics, Garnish und Drink Decor von MFT gemacht. Ich habe sie - bis auf die Gläser - aus weißem Cardstock gestanzt und mit Copics coloriert. Dabei habe ich versucht,  jedes Glas mit einem anderen Drink zu füllen. Die Eiswürfel sind aus deinem Stempelset von SU und mit grauer Tinte gestempelt.
Die Gläser habe ich aus Folie gestanzt. Dabei habe ich laserbedruckbare Overhead Folie verwendet, die ein wenig milchig ist, so sieht man die Gläser besser. An einige habe ich mit klar trocknendem Flüssigkleber und Distress Rock Candy Glitter einen Zuckerrand angebracht.
Um die Cardstockstücke an den Gläsern zu befestigen, habe ich sie auf der Oberseite mit meinem Xyron mit Kleber beschichtet und an die Folien-Gläser geklebt.
Der Text ist mit einer Kombi aus zwei Stempeln aus den Sets Here's to You und Uncorked, beide ebenfalls von MFT, zusammengesetzt. Er ist schwarz auf weißen Cardstock gestempelt, den ich schwarz hinterlegt habe.

The drinks are all made using the die sets Longstem Barware, Barware Basics, Garnish and Drink Decor by MFT. I die cut all pieces - except for the glasses - from white cardstock and colored them with my Copics. I tried, to fill a different drink into each glass. The ice cubes are a stamp by SU and stamped with grey ink.
The glasses I die cut from acetate. I used laser printable overhead acetate, that is a bit milky. This way the glasses are better noticable. Using clear drying liquid glue and Distress Rock Candy Glitter I added a sugared brim to some of them.
To attached the cardstock pieces to the glasses I run them, upside down, through my Xyron and then put them behind the glasses.
The text is made combining two stamps from the sets Here's to You and Uncorked, both also by MFT. I stamped it black onto white cardstock, that I matted black.


Hinter den Cardstockstücken in den Gläsern konnte ich gut den Kleber, mit dem die Gläser auf dem Hintergrund befestigt sind, verstecken. Einige sind direkt auf den Cardstock geklebt, für andere habe ich dünnes oder dickes 3D Tape benutzt. Auch der Textstreifen ist mit 3D Tape aufgebracht.
Als Deko habe ich dann noch einige goldene Perlen sowie rechts und links des Textes kleine Herzen aufgeklebt.
Dann habe ich alles auf einem weißen Kartenrohling befestigt. Eine schwarze Mattung hätte bestimmt gut ausgesehen, da ich aber schon Probleme hatte, alle Elemente von der Höhe passend auf den Cardstock zu bekommen, habe ich darauf verzichtet.

Behind the cardstock pieces in the glasses I was able to hide the glue that was used to attache the glasses to the background. I adhered some directly to the cardstock, for some I used thin and thick foam tape. Also the text strip is adhered with foam tape.
To decorate the card I added a few gold pearls and a little red heart to the left and right of the text.
Then I attached everything to a white card base. I had planned to mat it black, but it was hard enough to add all the elements to this piece of cardstock so I skipped the mat.

Samstag, 15. April 2023

Alles Gute für Dich

 
Hallo Ihr Lieben!
Von Freundinnen habe ich einen Gutschein von CreativeDepot geschenkt bekommen, den ich nun eingelöst habe. Und zwei der bestellten Artikel kamen auf dieser Karte zum Einsatz.
 
Hello everyone!
I got a giftcard from friends for a german shop/brand called CreativeDepot. I went shopping and used two of the  items I got I used on this card.

Besonders gespannt war ich auf die Hotfoil Plate, die ich gekauft habe. Bei der ersten Hotfoil Plate einer Marke, die ich kaufe, bin ich immer etwas angespannt. Sie sind ja doch alle etwas unterschiedlich, und auch jede Maschine (sowohl Hotfoil als aus Stanzmaschine) ist etwas verschieden. Aber mit meiner GoPress und der Big Shot konnte ich problemlos und mit einem super Ergebnis folieren.
Ich hatte mir das Regenbogen Mix Hotfoil Set bestellt. Eine Regenbogen-Hotfoil Plate hatte ich noch nicht, und diesen kann man auseinander zwicken und so die einzelnen Bögen in unterschiedlichen Farben folieren. Das habe ich hier gemacht - in Glitzer-Pink, Glitter-Gold, Grün und Glitter-Türkis. Dann habe ich den Cardstock rundherum mit Distress Oxide Bundled Sage, Speckled Egg, Broken China, Uncharted Mariner und ein wenig Black Soot gewischt und ein klein wenig Wasser aufgespritzt.

I was really curious about the hotfoil plate I ordered. Whenever I get the first hotfoil plate of a brand I haven't tried so far, I am a bit anxious. Every brand makes their plates a bit different, and also each machine (hotfoil and die cutting) is a bit different. But with my GoPress and my BigShot hot foiling this plate worked like a charm and I got a perfect result.
I had ordered a rainbow hotfoil plate. I didn't have one so far and here you can snip the arches apart and foil each in a different color. That's what I did here - glittery pink, sparkly gold, green and sparkly turquoise. Then I inked the cardstock around the foiled rainbow with Distress Oxide Bundled Sage, Speckled Egg, Broken China, Uncharted Mariner and a bit of Black Soot and flicked just a bit of water over the panel.


Hier könnt Ihr den Regenbogen besser sehen. Da die Bögen nicht alle exakt gleich in der Form sind, muss man auch nicht ewig rummachen, bis die Bögen perfekt parallel liegen - bei Hotfoiling ja doch etwas schwierig. Ihr merkt, ich bin begeistert....
Als Deko habe ich dann einige Wolken an die Enden des Regenbogens gesetzt. Die Wolke mit dem sterne-angelnden Hasen sowie eine der kleineren Wolken sind aus dem Stempelset Wish Upon a Star, die anderen beiden Wolken aus dem Set Fly With Me, jeweils von MamaElephant. Von denen sind alle Motive, die ich auf meiner Karte verwendet habe. 
Außerdem habe ich drei weitere Sterne abgestempelt und - genauso wie alle anderen Motive - mit Copics coloriert. 

Here you get a closer look at the rainbow. Since the arches aren't shaped exactly the same you don't have to frickle with them until they are lined up perfectly  - not an easy thing to do with hotfoiling. As you can notice, I really love this plate!
To decorate my card I added a few clouds to the ends of the rainbow. The large cloud with the star-fishing bunny on, and one of the smaller clouds are from the Wish Upon a Star stamp set, the other clouds from the Fly with Me set, both by MamaElephant. All the images on this card are made by  them.
I also stamped three stars and colored them with Copics - as I did all the images on this card.


Im unteren Bereich meiner Karte habe ich den Text in die Szene mit eingebunden. 
Für das "gute" kam das Stempelset "Alphabet Klein - Kleine Streifen", das ich mir ebenfalls von dem Gutschein gekauft habe, zum Einsatz. Ich habe sie einmal mit blau-türkiser Tinte abgestempelt und per Hand ausgeschnitten. Dann habe ich sie nochmal mit Distress Oxide auf schwarzen Cardstock gestempelt und ebenfalls ausgeschnitten - die Stempellinien hier dienten nur als Anhaltspunkt, wo ich schneiden muss, man sieht die Stempelabdrücke nicht, aber Oxides sieht man an sich ganz gut auf schwarzem Cardstock - und hinter die blau-weißen Buchstaben geklebt. 
Für den Rest des Textes habe ich Stempel aus dem Set Kleine Worte von Stampcorner weiß auf schwarzen Cardstock embosst und ebenfalls ausgeschnitten.
Rund um den Text habe ich viele kleine Hasen aus den Sets Hippity Hop und Dandelion Wishes gesetzt. Oh, und eine kleine Maus, die gerade an einem Löwenzahnsamen davonfliegt, ist auch noch auf die Karte gehüpft.
Unter die Hasen, die am Boden stehen, habe ich noch schwarze Schatten geklebt - die erden die Motive so wundervoll und es sieht nicht so aus, als würden sie in der Luft schweben. Dafür habe ich die Shadows and Flowers Stanze von Create a Smile verwendet.

In the lower part of my card I included the text in the scene. The text means "all the best for you". For the large letters I used another stamp set that I got for my giftcard. I stamped them with blueish-turquoise ink onto white cardstock and cut them out with my scissors. Then I used Distress Oxides to stamp them again onto black cardstock and cut those out as well - the stamped lines only were there for me to know where to cut, you don't see them anymore, but oxides are pretty good visible on black cardstock. Then I glued the black letters a bit off behind the blue-white ones.
For the rest of the text I white heat embossed stamps by Stampcorner onto black cardstock and cut those out as well.
Around the text I added a few little bunnies from the sets Hippity Hop and Dandelion Wisdhes. Oh, and a little mouse, flying away with a dandelion seed, went on the card as well.
To the bottom of those bunnies, that are standing on the ground, I attached black shadows - those really ground the images and they don't look like floating around. I used the Shadows and Flowers die by Create a Smile to cut those.


Einige der Motive sind direkt auf den Cardstock geklebt, für die anderen und die Texte habe ich teils dickes, teils dünneres 3D Tape verwendet. 
Und hier auf dem Bild könnt Ihr den tollen Glanz  und Glitzer des folierten Regenbogens nochmal besser sehen. 

Some of the images are attached directly onto the cardstock, for the rest and the text I used foam tape - thin one for some, thicker one for the others.
And here on this picture you can see the glitter and shine of the foiled rainbow better. 

Freitag, 14. April 2023

Ink Lifting Backgrounds

 
Hallo Ihr Lieben!
Auch im April gibt es in der Share Handmade Kindness Gruppe  natürlich wieder einen Technique Throwback Thursday. Das Video diesen Monat ist über Ink Lifting - und weil man bei den meisten der Techniken gleich zwei tolle Hintergründe auf einmal erhält, habe ich auch zwei Karten zu zeigen.

Hello everyone!
Of course, also in april they are doing the Technique Throwback Thursday over at the Share Handmade Kindness group. This month's video is about ink lifting - and since you end up with two great backgrounds with most of the techniques shared in the video I also have two cards to share today. 
 
Auf dem Bild oben kann man schon erahnen, dass es sich bei dem helleren Hintergrund um das Spiegelbild des dunkleren handelt. 
Für die Hintergründe habe ich Distress Ink Mowed Lawn, Salty Ocean und Prize Ribbon direkt mit dem Kissen satt auf ein Stück weißen Cardstock aufgetragen. Anschließend habe ich den Marble Background von MFT mit klarem Embossingpuler aufembosst. Und dann kommt das Magische an dieser Technik - der Cardstock wird mit Wasser besprüht, mit einem weiteren Stück Cardstock abgedeckt und beide gleichzeitig durch die Big Shot gedreht. So überträgt sich etwas der Tinte auf den blanken Cardstock, aber nur an den Stellen, an denen sich kein Embossingpulver befindet und die Farben sind hier viel zarter. Gleichzeitig wird an den nicht embossten Stellen des ursprünglichen Cardstocks die Farbe, die ja hier abgetragen wird, etwas aufgehellt, so dass man das klar embosste Muster nun dunkler sieht.  
Ich hatte wohl eine Ecke nicht so gut mit Wasser eingesprüht, aber bei dem von mir verwendeten Muster fällt das fast gar nicht auf. 

On the picture above you can already guess that the lighter background is the mirror image of the darker one.
For the backgrounds I inked up one piece of white cardstock really good with Distress Ink Mowed Lawn, Salty Ocean and Prize Ribbon by pressing the ink pads directly onto the paper, then clear heat embossed the Marble Background by MFT onto it. And then the magic happens - you mist the cardstock with water, place another piece of white cardstock and top and run both together through your die cutting machine. This way, some of the ink gets transfered to the blank cardstock, but only in the areas, that are not covered with embossing powder, and the ink on that second piece of cardstock is also way softer. At the same time, the ink in the non embossed areas gets lightened up a bit - since the ink gets transfered to the other sheet - and the clear embossed areas are darker now which makes the pattern better visible. 
Seems like I didn't mist one of the corners of my cardstock good enough, but with the pattern I used that really isn't noticeble. 


Mit dem farblich kräftigeren Hintergrund ist diese Geburtstagskarte entstanden. Vor dem Dekorieren habe ich etwas weiße Metallic Watercolor aufgespritzt. 

With the bolder background I made this birthday card. Before decorating it, I flicked some white metallic watercolor onto the background.


Als Deko habe ich die Oops-Stanze von WhimsyStamps verwendet. Die Schattenlage habe ich aus weißem Cardstock gestanzt, die Buchstaben jeweils dreimal aus türkisfarbenem Cardstock und alles zusammengeklebt.
Auf das zweite O habe ich diesen süßen Froschkopf aus einem Stempelset von Action aufgeklebt. Er ist mit Copics coloriert. Außerdem habe ich zwei Luftallons aus dem Adorable Elephants Stempelset von MFT aufgeklebt, auch die sind mit Copics coloriert. 
Aus demselben Set ist auch der schwarz auf weißen Cardstock gestempelte Text. Ich habe ihn auf mehrere Male gestempelt und den Cardstock dabei etwas verschoben, um das O und R in Forgot zu tauschen, so dass da nun "frogot" steht. Ich fand, das passt super zu dem Froschgesicht...
Der Text, den ich unten quer über die Karte aufgeklebt habe, ist aus dem Stempelset Bitty Birthday Wishes von MFT. Ich habe ihn weiß auf schwarzen Cardstock embosst und mit 3D Tape aufgeklebt. Am Himmel habe ich noch drei kleine Wolken verteilt.

To decorate this card, I used the Oops die by WhimsyStamps. I die cut the shadow layer from white cardstock, the letters three times from aqua cardstock and then put the word together.
Onto the second O I adhered this cute frog, that I found at a local dollar store. I colored him with Copics. I also added two balloons from the Adorable Elephants stamp set by MFT, again colored in with Copics.
From the same set is also the text, that is stamped black onto white cardstock. I stamped it divided into parts, moving my cardstock in the Misti inbetween to switch the O with the R in the word forgot, so not there's a "frogot" written. I thought, that would be cute in combination with the frog image...
The text, that I attached across the bottom of the card, is from the Bitty Birthday Wishes stamp set by MFT. I white heat embossed it onto black cardstock and adhered it with foam tape. Then I also added three white clouds to the top of the card.


Hier kann man im oberen Bereich das Embossingpulver auf diesem Hintergrund recht gut erkennen.
Als Deko habe ich noch ein paar blau-grün changierende Glitzersteine aufgeklebt und alles auf einem weißen Kartenrohling befestigt.

Here, in the upper half of the card, you get a pretty good look at the embossing powder on this background.
To decorate the card I added a few blue-green iridescent rhinestones and attached everything onto a white note card.


Nun wollte noch der hellere Hintergrund verarbeitet werden. Da sich hier kein Embossingpulver auf dem Hintergrund befindet, konnte ich direkt darauf stempeln. Zuvor habe ich goldene Metallic Watercolor aufgespritzt.

Now the lighter background wanted to get turned into a card. Since there is no embossing powder on this background I was able to stamp directly onto it. Before I flicked some gold metallic watercolor onto the cardstock.


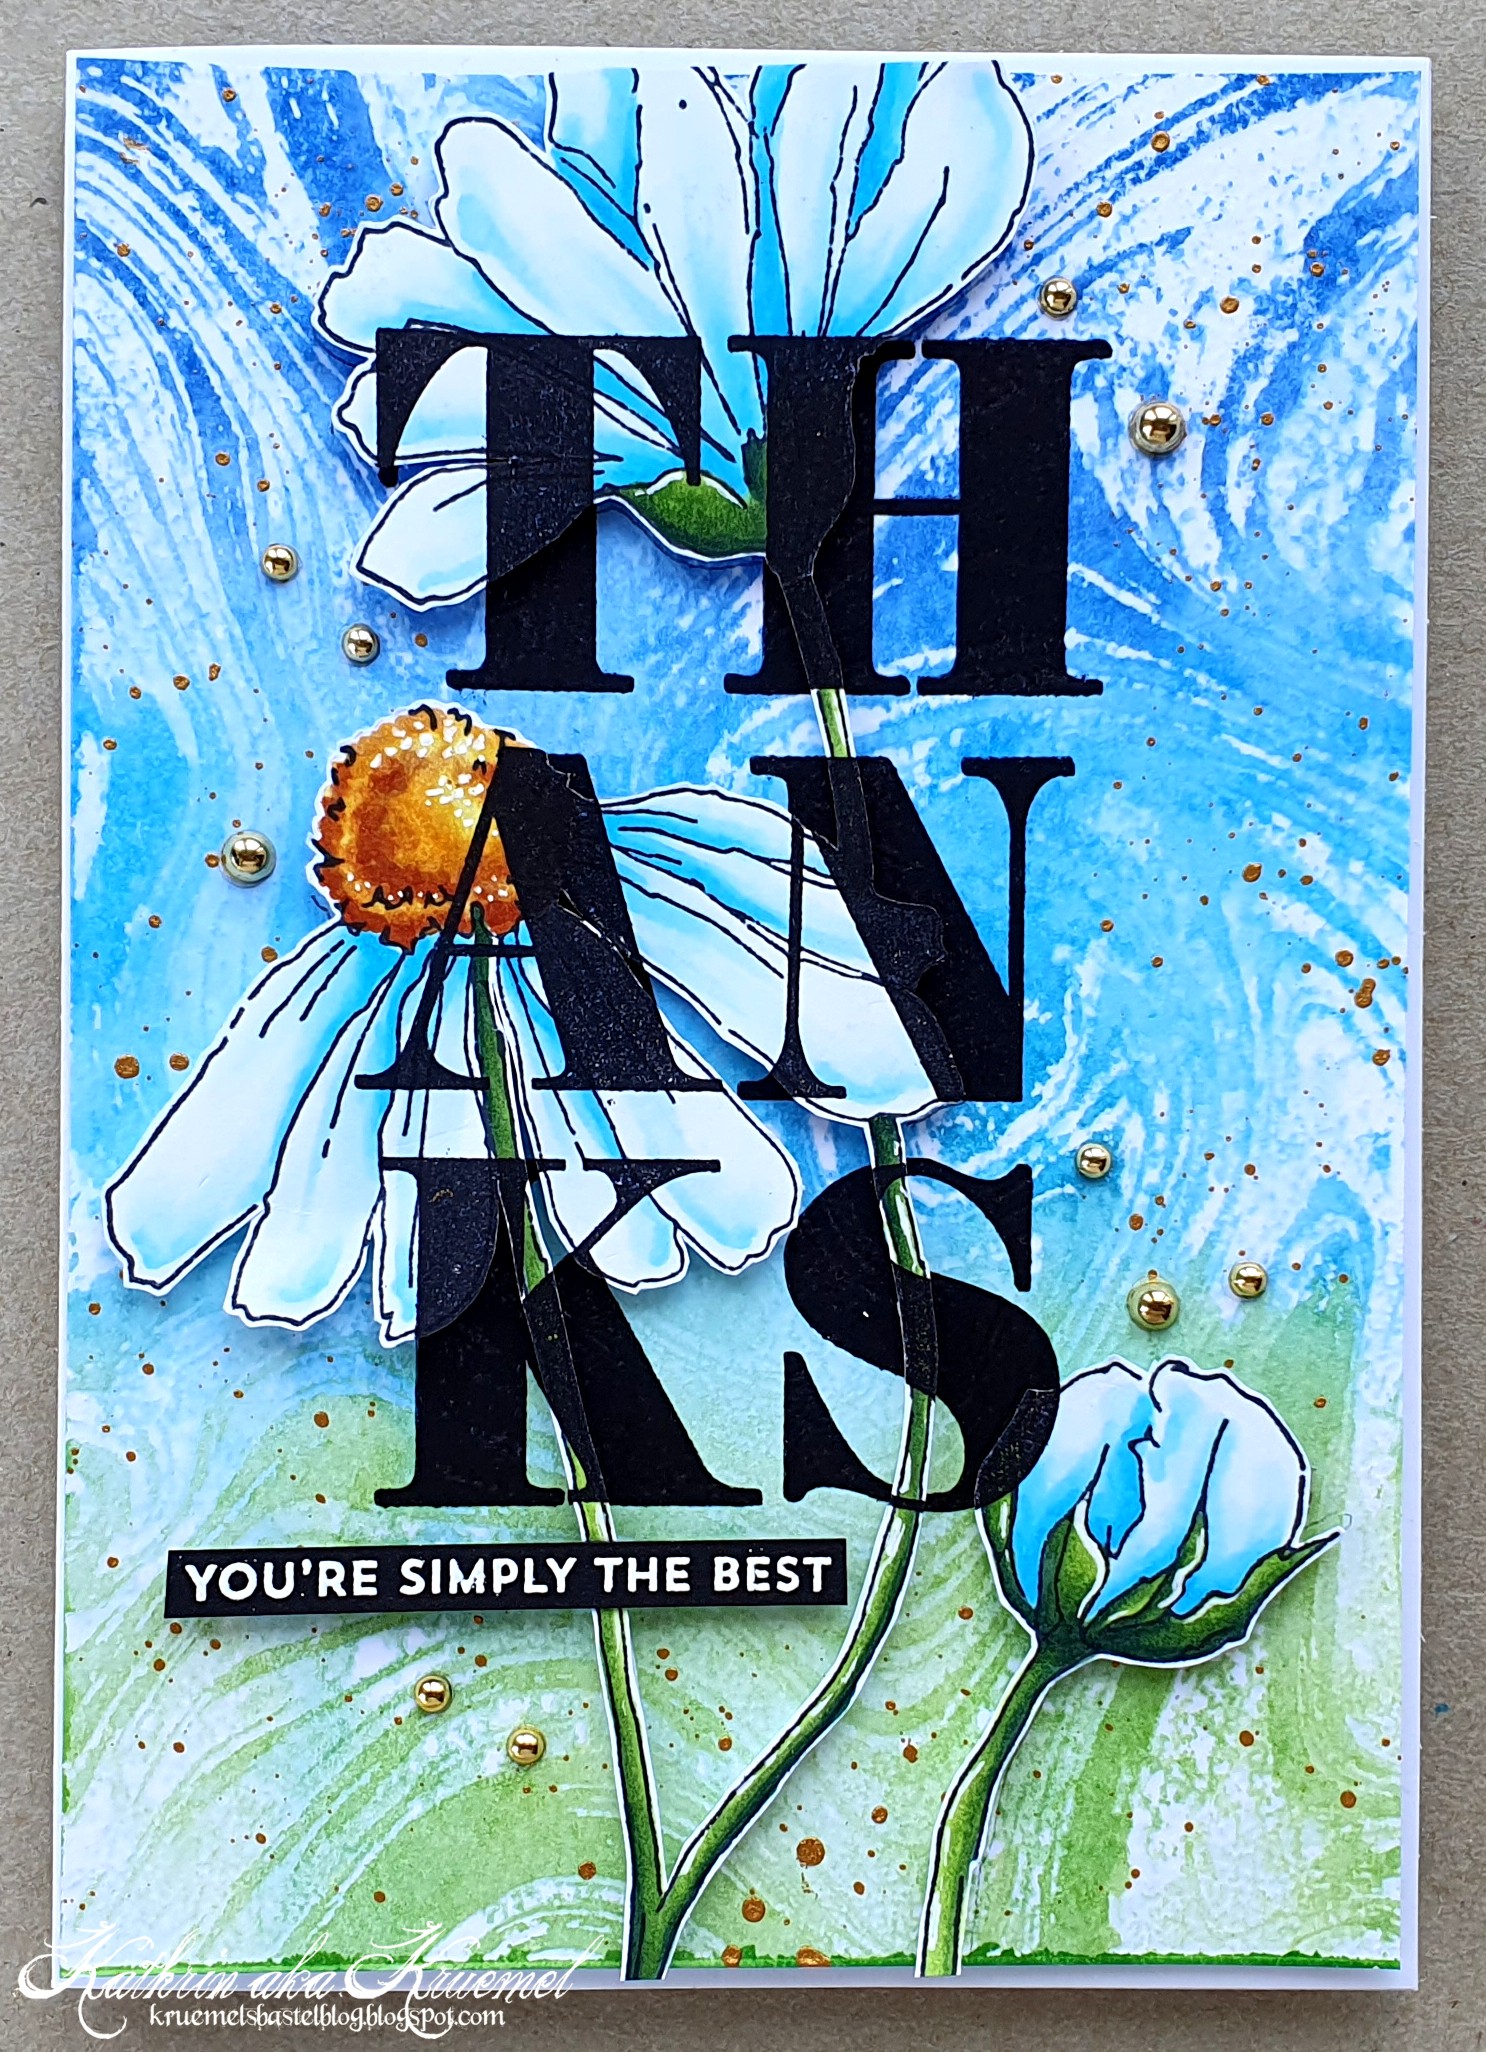
Hier habe ich zuerst die tollen Blumen aus dem Essentials No463 Stempelset von StudioLight abgestempelt, mit Copics coloriert und sie anschließend mit der Schere ausgeschnitten. Dann habe ich sie genau an die Stelle meines Hintergrunds gelegt, an der ich sie später aufkleben wollte und mit dem großen Thanks Stempel aus dem Jumbo Sentiments Stempelset von TheTon mit Versafine Clair Nocturne aufgestempelt. Die Blumen habe ich dann vorsichtig entfernt und den Text nochmal an die selbe Stelle auf dem Hintergrund gestempelt. Dann habe ich die ausgeschnittenen Blüten mit 3D Tape wieder aufgeklebt. 
Der kleine Text ist aus dem Set Itty Bitty Thanks von MFT und weiß auf schwarzen Cardstock embosst. Ich wollte goldenes Embossingpulver verwenden, aber ich tue mich immer ein wenig schwer, das auf schwarzem Cardstock zu lesen, vor allem, wenn die Linien recht dünn sind. Deswegen habe ich lieber zu weißem Pulver gegriffen. 

Here I first stamped those beautiful flowers from the Essentials No463 stamp set by StudioLight, colored them with Copics and cut them out with my scissors. Then I placed them exactly in the place of my background, where I wanted to glued them down later and used the large thanks image  from the Jumbo Sentiments stamp set by TheTon and Versafine Clair Nocturne ink to stamp the text onto the flowers. I carefully removed the flowers and stamped the text again on the background, making sure to not move the cardstock. Then I attached the flowers to the background using foam tape.
The small text is from the Itty Bitty Thanks stamp set by MFT and white heat embossed onto black cardstock. I wanted to use gold embossing poweder, but I think, it's a bit hard to read on black cardstock, especially when the lines are thinner. So I went with the white one.


Hier sieht man, wie die dicken gestempelten Buchstaben fließend von den erhöht aufgeklebten Blumen zum Hintergrund übergehen. 
Als Deko habe ich dann noch ein paar goldene Perlen aufgeklebt und alles auf einem weißen Kartenrohling angebracht.

Here you can see, how the bold letters on the raised flowers and the background continue smoothly.
I added a few gold pearls as decorations and then adhered everything to a white note card.

Donnerstag, 13. April 2023

Sei mutig!

 
Hallo Ihr Lieben!
Heute zeige ich auf dem Stampcorner Blog diese Karte - mal ganz anders als das normale rechteckig. Stattdessen mit einem freistehenden Regenbogen über weißen Wolken. Und natürlich darf ein süßes Motive nicht fehlen.

Hello everyone!
Today I am sharing this card over at the Stampcorner Blog - it's not your usual rectangle card, instead it has a free standing rainbow over white clouds. And of course a cute image can not be missed on such a card.

Natürlich verrate ich Euch alles zur Karte gleich noch genauer. Aber diese besondere Kartenform hat mir echt viel Spaß beim Werkeln gemacht.

Of course I will tell you all the details about this special card form in just a bit. But making this card was a lot of fun.


So sieht die Karte flach liegend aus. Ich habe einen weißen Kartenrohling verwendet und aufgeklappt eine Wolkenbordüre daraus gestanzt. Ich habe dabei die Kante der Stanze am Falz anliegen lassen und erst die Kartenfront nach rechts abfallend ausgestanzt. Anschließend habe ich die Stanze auf den hinteren Teil der Karte aufgelegt und die Wolken nach rechts aufsteigend gestanzt. So treffen sie am Falz aufeinander, trotzdem sind die hinteren Wolken bei geschlossener Karte als zweite, etwas höhere Lage sichtbar. 
Ich habe noch ein weiteres Stück weißen Cardstocks mit der gleichen Wolkenstanze ausgestanzt und nur über die untere linke Ecke der Kartenfront geklebt. Zum Aufkleben habe ich dünnes 3D Tape verwendet. 

This is the card laying flat. I used a white card base and die cut a cloud border from the opened card. I put the end of the border right at the fold and first cut the border from the card front, making sure the clouds go lower towards the right edge. Then I moved the die to the back of the card and cut it again, this time going up towardsd the right edge. This way the clouds are about the same height at the fold but still the clouds cut from the back of the card are visible as a higher level when the card closed. Then I cut the clouds again from another piece of white cardstock and adhered this only to the left corner of the card. To attach these I used thin foam tape.


Wir vom Designteam zeigen Euch ja jeden Monat vor allem viele Karten mit neuen Motive. Ich finde es aber auch schön, immer wieder mal die älteren Motive auszupacken. Deswegen habe ich hier zu dem Elefant und Hasen im Heißluftballon aus dem Freunde 4 Stempelset gegriffen. Das Motiv habe ich dann mit Copics coloriert, Highlights mit einem weißen Gelstift gesetzt und es ausgeschnitten. Dann habe ich es auf die Kartenfront-Wolken geklebt. Und weil es mir nicht gefiel, dass man die Copics, die durch den Cardstock auf der Rückseite des Motivs durchgeblutet haben, bei geöffneter Karte sehen kann, habe ich von hinten noch weißen Cardstock dagegen geklebt und ebenfalls entlang der Stempellinien ausgeschnitten. 
Für den Regenbogen habe ich die Stitched Tall Rainbow Stanze von MFT verwendet. Ich habe den Regenbogen aus weißem Cardstock gestanzt und anschließend die einzelnen Bögen mit Copics coloriert. Dann habe ich sie auf weißen Cardstock geklebt um sie zu verbinden, alles mit der Schere ausgeschnitten und den Regenbogen auf die Wolken-Kartenrückseite geklebt.

We from the design team share lots of cards with all the beautiful new images each month. But I also like to bring out my older stamps every now and then. So I picked the elephant and bunny in their hot air balloon from the Freunde 4 stamp set for today's card. I colored the image with Copics, added highlights with a white gel pen and then cut it out. Then I adhered it to the card front clouds. And since I didn't like that the back of the image, where the color bled through, was visible when the card is opened, I glued some white cardstock behind it and also cut this layer out along the stamped lines.
For the rainbow I used the Stitched Tall Rainbow die by MFT. I die cut it from white cardstock and then colored the individual arches with Copics. Then I glued them onto a piece of white cardstock to connect them, cut the whole rainbow out and adhered it onto the clouds that create the back of the card.


Zum Öffnen der Karte wird die vordere Wolkenlage mitsamt dem Motiv aufgeklappt. Und so sieht die Innenseite der Karte aus.
Hinter dem Heißluftballon habe ich einen "sei mutig" Text versteckt. 
Unten habe ich erst zwei einzelne Wolken aufgeklebt, um die Enden des Regenbogens zu verstecken. Dann habe ich hier noch ein "entdecke die Welt" aufgestempelt. Beide Texte sind aus dem Stempelset Sei Mutig und mit silberfarbenem Embossingpulver embosst - einmal auf schwarzen Cardstock, einmal direkt auf die Kartenbasis. Beim unteren Text musste ich auf zweimal stempeln und zwischendrin den Cardstock etwas verschieben, so dass ich nicht auf den Rand der Wolke getroffen bin. Dort hätte der Stempelabdruck nicht so perfekt ausgesehen. 
Zum Schluss habe ich dann noch einige Sterne, gestanzt aus silberfarbenem Glittercardstock mit den Sternen aus dem Moon and Stars Mobile von LawnFawn, auf der Karte verteilt.

To open the card you just fold the front layer of clouds including the image aside. And this is the opened card.
Behind the hot air balloon I've hidden a "be brave" text.
To the base of the card I first glued two single clouds to hide the ends of the rainbow. Then I added a "discover the world" text there. I heat embossed both texts with silver embossing powder - one onto black cardstock, the other one directly onto the card base. This text I had to stamp in two steps, moving my cardstock a bit inbetween to avoid stamping onto the edges of the cloud. The text just wouldn't have stamped perfectly there.
To finish the card I die cut a few stars from the Moon and Stars Mobile die by LawnFawn from silver glitter cardstock and glued them all over the card.

Mittwoch, 12. April 2023

Create a Smile April Sketch Challenge Reminder

 
Hallo Ihr Lieben!
Bei mir verläuft das Basteln meist in Phasen - manchmal habe ich so viele Ideen im Kopf, dass ich sie mir aufschreiben muss, manchmal bin ich so richtig ideenlos und fange einfach mal an, mal sehen, was sich entwickelt. Momentan bin ich eher in einer kreativen Hoch-Phase, wobei das Wetter, das ja nicht gerade zum Draußensein einlädt, da sicher auch eine Rolle spielt.
Und so habe ich heute eine eher cleane Karte zu zeigen, für die ich nochmal den Sketch der aktuellen Create a Smile Challenge verwendet habe. Ihr könnt noch knapp eine Woche mitmachen.

Hello everyone!
For me, being creative goes in phases - sometimes I am so full of ideas that I have to write them down, sometimes I  don't know what to make and just start with something that catched my eye, letting the card tell me where it wants to go. Right now I am more in a creative high, and I am sure that the weather, that isn't inviting me to be outside, has its role in it.
So I made another card, this time in a pretty clean style, using the sketch of the current Create a Smile Challenge. You still have nearly one week left to join us.

Vor kurzem habe ich mir das Stempelset Licht ins Dunkel gekauft. Und weil die beiden Maulwürfe gegengleich sind und noch dazu die Arme etwas angehoben haben, dachte ich mir, die müssten sich doch super in den Armen liegen können...
Für den Hintergrund habe ich einen kleinen ovalen Stencil auf die Stelle eines Stücks weißen Cardstocks gelegt, auf die ich später die Motive aufkleben wollte. Dann habe ich mit Distress Oxide Tattered Rose, Aged Mahogany und Black Soot den Cardstock eingefärbt und ein klein wenig Wasser darauf gespritzt.

A little ago I got myself the Licht ins Dunkel stamp set. And since those two moles are looking the opposite direction and also have their arms up a bit, I thought, they would be perfect to hold each other...
For the background I place a small oval stencil on that place on a piece of white cardstock, where I wanted to attach my images later. Then I inked the cardstock with Distress Oxide Tattered Rose, Aged Mahogany and Black Soot and flicked just a bit of water on top.


Die beiden Maulwürfe habe ich abgestempelt und mit Copics coloriert. Es war ein wenig ein Hin und Her, welcher Arm/Bauch/Kopf über dem anderen liegen sollte, aber ich finde, so sieht es jetzt richtig aus. Ich habe kleine Schlitze ober- und unterhalb der Arme geschnitten, so dass ich die Motive ein wenig ineinander schieben konnte. 
Unter die beiden Maulwürfe habe ich einen Schatten, gemacht mit der Shadows and Flowers Stanze und schwarzem Cardstock, geklebt. 
Für den Text habe ich das Doppelte Du mit einem gestempelten Text kombiniert. Die obere Lage des Du habe ich aus rotem Glittercardstock gestanzt, die Schattenlage dahinter aus Vellum. Der gestempelte Text ist aus dem Set Alles über Dich und weiß auf schwarzen Cardstock embosst. Ich habe ihn mittig geteilt, damit ich ihn zweizeilig auf die Karte kleben konnte.
Ich habe die Motive und den Text auf den Hintergrund geklebt und mit kleinen Herzen, gemacht mit der Hearts Stanze und rotem Glitzercardstock, verziert. 
Ganz zum Schluss habe ich alles schwarz gemattet und auf einen weißen Kartennrohling geklebt.

I stamped the two moles and colored them with Copics. I had to try a bit to find out, which arm/tummy/head I wanted in the front, but I think, now it looks right. I cut little slits above and under the arms to be able to slide the images a bit into each other.
Under the moles I placed a shadow, made with the Shadows and Flowers die and black cardstock.
For the text I combined a die cut "you" with a stamped text. The whole text means "you have a place in my heart". I cut the top layer of the word you from red glitter cardstock, the shadow layer from vellum. Then I white heat embossed the rest of the text onto black cardstock and cut it into two pieces, to have to lines of text on my card.
I attached the images and the text onto the background and then decorated the card with a few hearts, die cut with the Hearts die from red glitter cardstock.
To finish the card, I matted everything black and adhered it to a white note card.

Dienstag, 11. April 2023

To my favorite Chick

 
Hallo Ihr Lieben!
Mit der heutigen Karte werfe ich mal ein frühlingshaftes Hallo aus dem Garten in die Runde! Okay, ich gebe zu, so schön blüht es da natürlich noch nicht. Aber Vorfreude ist ja bekanntlich die schönste Freude!

Hello everyone!
With today's card I am sending out a spring-ish hello from the garden to all of you! Okay, I admit it, of course the flowers aren't blooming that nicely - yet. But here we say "anticipation brings the most joy". 

Hier habe ich für den Hintergrund mit Partial Die Cutting nur den oberen Teil eines Stücks weißen Cardstocks mit der Sunburst Backdrop Stanze von LawnFawn ausgeschnitten und dann seitlich rechts und links je etwas weggeschnitten, so dass das amerikanische A2 Format auf eine deutsche DinA5 Karte passte.
Mit Masking Tape habe ich erst etwa das obere Drittel der Karte abgedeckt und nach unten hin Distress Oxide Mowed Lawn aufgewischt. Dabei habe ich es nach unten hin auslaufen lassen. Anschließend habe ich den unteren Teil abgedeckt und den zuvor gestanzten Bereich mit Distress Oxide Mermaid Lagoon gewischt und nur dort etwas weiße Metallic Watercolor aufgespritzt.

Here I did some partial die cutting and only cut the top of a piece of white cardstock with the Sunburst Backdrop by LawnFawn, then cut off a strip of both sides to make the american A2 size fit a german DinA5. 
I covered the upper third - more or less - with masking tape and then inked the area under it with Ditress Oxide Mowed Lawn, letting the color fade into white. Then I covered the lower part of the cardstock and inked up the area, that I had die cut before, with Distress Oxide Mermaid Lagoon. I also flicked some white metallic watercolor just onto that blue inked area.


Für meine  Szene habe ich wilden Markenmix betrieben.
Eigentlich wollte ich eine Gießkanne in die Mitte der Karte stellen, aber ich habe tatsächlich nur ganz kleine Motive. Also habe ich nach Alternativen gesucht und bin über eine Tag-Stanze in Gummistiefelform, die es mal in einem der DooHickey Kits von Magnolia gab, gestolpert. Ich habe sie zweimal aus weißem Cardstock gestanzt, die Öse weggeschnitten und sie dann mit Copics coloriert. Ihr könnt sagen, was Ihr wollt, aber echte Gummistiefel müssen bei mir gelb mit blauem Stoffrand sein... Da in die Gummistiefel kleine Löcher gestanzt werden, habe ich noch etwas weißen Cardstock dunkelgelb coloriert und hinter die Löcher geklebt.
Das tolle Blumenbett ist aus dem Stempelset Loads of Love von HoneyBeeStamps - und eigentlich als Füllung für die Ladefläche des PickUp Trucks gedacht. Ich habe erst die linke Hälfte gestempelt, den Cardstock etwas weiter geschoben und dann die rechte Hälfte, damit das Beet etwas weiter wird. Sonst hätten die Gummistiefel zu viele der Blumen verdeckt. Außerdem habe ich die eigentlich rechts herabhängende Ranke beim Stempeln abgedeckt. Auch die Blumen sind mit Copics coloriert und anschließend per Hand ausgeschnitten. 
Und dann musste ich unbedingt noch ein paar der süßen Küken aus dem Set Little Chickie Agenda von MamaElephant mit verwenden. Auch die sind mit Copics coloriert - den Brief, den das rechte Küken eigentlich hält, habe ich beim Ausschneiden weggeschnitten. Außerdem habe ich den Blumentopf, der eigentlich niedriger ist, durch den ersetzt, in dem der Hase aus dem Little Bunny Agenda Set sitzt.
Ich habe alle Teile mit 3D Tape zusasmmengeklebt und unten an die Stiefel sowie neben dem Küken im Blumentopf noch ein paar Grashalme aufgestempelt. Dafür habe ich einen der Stempel aus dem Set Perfect Couple von MFT immer nur teilweise mit Distress Ink Mowed Lawn eingefärt und sowohl auf die Stiefel als auch den Hintergrund gestempelt.

For my scene I did some wild mix of products from different brands.
I had planned to put a watering can in the center of my scene, but I actually only have very small images of those. So I went through my stash, looking for something else I could use, and came across a tag die in the shape of a rubber boot, that was included in one of their DooHickey Kits some years ago. I die cut it twice from white cardstock, cut off the hook/loop and then colored them with my Copics. And for me, rubber boots HAVE to be yellow with a blue fabric brim... Since the die cuts little holes in the boots, I colored another piece of white cardstock in a dark yellow and glued pieces of it behind the holes.
The great flower bed is from the Loads of Love stamp set by HoneyBeeStamps - and actually a truck load for the PickUp Truck. I stamped the left half first, moved my paper a bit and then stamped the right half, making the bed a bit wider this way. In the original size the boots would have covered too much of the flowers. I also covered the vines, that are hanging down from the right edge of the flower stamp, when stamping the image. I used Copics again to color the flowers, then cut them out with my scissors. 
And then I just had to include some of the cute chicks from the Little Chickie Agenda stamp set by MamaElephant. I colored them with Copics as well. I cut off the envelope, the chick on the right is holding, and also replaced the flower pot the chick is sitting in with the one with the bunny from the Little Bunny Agenda stamp set in it, since that is a bit taller. 
I glued all pieces together with foam tape and then added some grass under the boots and next to the flower pot. I used one of the stamp from the Perfect Couple stamp set by MFT, only inked up parts of it and stamped it with Distress Ink Mowed Lawn onto the boots and the background.


Für den Text  habe ich das hello aus dem Stanzenset Sweet Hello von MFT ganz oft - ich habe nicht mitgezählt - aus schwarzem Cardstock gestanzt und alle Teile aufeinander geklebt. Die oberste Lage habe ich dabei über die Motive geklebt - die Lagen darunter habe ich benötigt, um den Höhenunterschied zu den mit 3D Tape zusammengesetzten Motiven, auszugleichen. 
Unter das gestanzte hello habe ich noch einen kleinen Text aus dem Set Birthday Chicks mit schwarzer Tinte direkt auf den weißen Cardstock gestempelt und neben dem Text drei kleine rosafarbene Herzen aufgeklebt.

For the text I die cut a hello with the Sweet Hello die by MFT from black cardstock - I cut it many times and didn't count. Then I stacked the words, putting the top layer over the images. All the layers underneath I needed to make my word the same height as the images, that are put together with foam tape.
Under the die cut hello I stamped a small text from the Birthday Chicks stamp set by MFT, using black ink, and then added three small light pink hearts around the text.


Da mein Blumenbeet recht breit war, konnte ich den fertig dekorierten Cardstock nicht andersfarbig matten. Da ich trotzdem etwas Kontrast zum weißen Kartenrohling, auf den ich zum Schluss alles geklebt habe, haben wollte, habe ich dickes 3D Tape hinten auf den Cardstock aufgebracht und dann alles auf den Kartenrohling geklebt.

Since my flower bed was pretty wide, I wasn't able to mat the decorated cardstock with a different color of cardstock. I still wanted some contrast to the white card base I mounted everything on to. So I put some thick foam tape behind the decorated cardstock and then attached it to the note card.

Montag, 10. April 2023

You rock!

 
Hallo Ihr Lieben!
Habt Ihr die tollen Stanzen und Stempel aus dem März-Release von Concord and 9th rund ums Thema Musik/Schallplatten gesehen? Ich finde das ja klasse. Da mein Mann aber nicht mehr in der Band spielt und ich sonst sicher keine Verwendung dafür hätte, habe ich auch keine Rechtfertigung, um mir die Sachen zu kaufen. Aber dann fiel mir ein, dass ich einiges an Material habe, um eine Karte mit einem ähnlichen Sil zu machen. Und so ist diese Karte entstanden.

Hello everyone!
Have you seen the great music/vinyl themed dies and stamps from Concord and 9th march release? I love those. But since my husband is no longer playing in a band and I don't know who I would make a card for with these I had no reason to buy them (even if I really was dared to). And then I realized, I might have stuff at hand to create a card with a similar style. And that's how this card was created.

Unter den Stempeln aus dem Release ist ein Turnabout-Stempel mit Schallplatten. Man kann mit nur viermal abstempeln ein komplettes Stück Cardstock mit Schallplatten samt Labeln - falls gewünscht - in unterschiedlichen Farben stempeln. Ich habe stattdessen die kleine Schallplatte von Create a Smile, die eines der Motive ist, die es als Freebie zu einer Bestellung gibt, verwendet und sie so oft mit schwarzer Tinte in Reihen auf meinen Cardstock gestempelt, bis der komplett gefüllt war. Dabei habe ich den Cardstock immer im selben Maß im Misti verschoben, so dass die Reihen gerade sind. Dann habe ich im Stempelset Bubbles of Joy von MFT sogar noch einen kleinen gefüllten Kreis gefunden, der von der Größe her perfekt als Label passte. Den habe ich dann auf die gleiche Weise (und nicht immer perfekt) mit türkisfarbener Tinte in die Mitte jeder Schallplatte gestempelt. 
Klar, auf diese Weise ist man doch einige Zeit beschäftigt, aber Stempeln macht ja Spaß, so dass ich das nicht schlimm finde. 
Anschließend habe ich noch ein wenig silberne Metallic-Watercolor über den Cardstock gespritzt.

Among the stamps in the Concord and 9th release is a new Turnabout-Stamp with vinyls. By only stamping it four times, you get a whole 6 x 6 sheet full of vinyls including labels - if wanted - in different colors. Instead I used the small vinyl image by Create a Smile, that's one of freebies you get with an order, and stamped it in rows with black ink until my cardstock piece was filled. I moved the cardstock in my Misti in 3/4 inches to get even rows of and spacing between the individual images. Then I found a solid circle image in the Bubbles of Joy stamp set by MFT, that had the perfect size for my label. I did the same stamping process with this image, using light aqua ink. Not all of them ended perfectly in the center of the vinyl, but I don't mind.
Well, of course this way of creating the background takes way longer, but stamping is fun - and I just had fun a little longer.
Then I flicked some silver metallic watercolor onto the cardstock.


Vor einigen Jahren gab es, ebenfalls von MFT, mal ein Stanzenset Turntable mit einer Schallplatte und Tonabnehmerarm. Die Schallplattenstanze und den inneren Label-Kranz habe ich als Haupt-Deko für meine Karte verwendet. Die Schallplatte habe ich aus schwarzem Glossy-Cardstock gestanzt, das Label aus türkisfarbenem Cardstock. Den habe ich dann noch weiß hinterlegt. Auf das Label habe ich einen Text aus dem Set Vinyl Greetings von Create a Smile gestempelt.
Für den Text habe ich die Buchstaben für das Wort rock mit dem Cherry Lowercase Stanzenset von Create a Smile aus weißem Cardstock gestanzt und sowohl die weißen Buchstaben als auch den weißen Rand auf türkisblauen Cardstock geklebt. Anstelle des O habe ich eine weitere der kleinen Schallplatten gestempelt und mit 3D Tape aufgeklebt. Dann habe ich mit etwas Abstand rund um die Buchstaben herum geschnitten. 
Das kleine you ist Teil eines weiteren Textes aus dem Set Vinyl Greetings.
Und weil mir die Deko irgendwie auf den vielen kleinen Schallplatten etwas untergegangen ist, habe ich ein Rechteck aus Vellum geschnitten. Auf das habe ich Text und Schallplatte mit dünnem 3D Tape aufgeklebt und dann ebenfalls mit 3D Tape auf dem Hintergrund befestigt. 
Als Deko habe ich dann noch ein paar klare Glitzersteine aufgeklebt - auch auf einer "rockigen" Karte darf es ein wenig glitzern, finde ich.

A few years ago MFT release the Turntable die set with a vinyl and a pickup. I used the vinyl die and the smaller label ring as the main decoration for my card. I die cut the vinyl from black glossy cardstock, the label from aqua cardstock. I matted that white and stamped a text from the Vinyl Greetings stamp set by Create a Smile onto it.
For the text I die cut the letters for the word rock with the Cherry Lowercase die set by Create a Smile from white cardstock and used both the white solid letters and the white outlines on my card. I attached the letters to some aqua cardstock and used another of the small vinyl images instead of a letter O, attaching it with foam tape. Then I used my scissors and cut with a bit of a distance to the letters around the word to create a shadow layer. 
The small you is part of another text from the Vinyl Greetings stamp set.
And since the decoration somehow looked kind of lost on all those small vinyls in the background, I cut a rectangle from vellum. I attached the vinyl and text to it with foam tape, then adhered the vellum to the background using foam tape again.
As decoration I added a few clear rhinestones - even a "rock" card needs a bit of bling, right?


Und hier könnt Ihr die verschiedenen Lagen, vor allem aber den Glanz der Schallplatte, besser sehen. Die sieht durch den glossy Cardstock tatsächlich wie eine echte Schallplatte aus.
Zum Schluss habe ich alles schwarz gemattet und auf einen weißen Kartenrohling geklebt.

And here you get a better look at the different layers and especially the shine of the vinyl. Due to the glossy cardstock I cut the vinyl from it looks like the real thing.
To finish the card I matted my cardstock black and adhered everything to a white card base.

Samstag, 8. April 2023

Stempeleinmaleins - Ausgabe vom 08. April 2023

 
Hallo Ihr Lieben!
In der heutigen Ausgabe des Stempeleinmaleins zeigen wir Euch eine Sechseckige Explosionbox, die perfekt als Verpackung für eine kleine Flasche  Sekt ist. Da ich keine zur Hand hatte, habe ich die Größe meiner Box etwas verkleinert und sie so passend für eine Dose Sekt gemacht.

Hello everyone!
In today's issue of  Stempeleinmaleins we are sharing a tutorial for a Hexagon Explosion Box, that is perfect to put a little bottle of champagne inside. Well, I didn't have one at home so I changed the measurements a bit to make it smaller and the right size for a small can of champagne.


Da ja das Osterwochenende ist, fand ich, die Boxen würden sich gut als kleines Goodie beim Osterbrunch machen. Deswegen habe ich meine Box ganz im Osterlook gestaltet.
Die Box habe ich aus weißem Cardstock gewerkelt. Die Außenseiten habe ich von unten her leicht mit Distress Oxide Lost Shadow und Hickory Smoke gewischt. 

Since it's the easter weekend I though, these be cute little gifts for our  family easter brunch. And so I created a bunny themed box.
I made my box from white cardstock. I lightly inked up the sides from the bottom with Distress Oxide Lost Shadow and Hickory Smoke.


Am Deckel habe ich zwei Hasenohren angebracht. Die sind ebenfalls aus weißem Cardstock gemacht und mit Distress Oxide Picked Raspberry ein wenig rosa eingefärbt. Außerdem habe ich meinem Hasen einen kleinen Zylinder aufgesetzt - der überdeckt eine Klebestelle. Den Zylinder habe ich aus schwarzem Cardstock gemacht, ein Band aus grünem Cardstock drumgewickelt und außerdem ein kleines rosafarbenes Blümchen mit Perlenmitte daran befestigt.
Um den Deckel habe ich ein Stück rosafarbenes Organzaband gewickelt und vorne zur Schleife gebunden. Daran habe ich ein doppeltes Banner - aus rosa gemustertem Designpapier, das ich auch im Inneren der Box verwendet habe, und hellgrünem Cardstock - angebunden, auf das ich mit grüner Tinte "Gruß vom Osterhasen" gestempelt habe.

To the lid I attached two bunny ears. I die cut those from white cardstock again and inked them a bit with Distress Oxide Picked Raspberry. I also gave my bunny a black hat - it covers a seem and some glue. I made the hat from black cardstock, tied a ribbon made from green cardstock around it and decorated it with a little pink flower with a white pearl in the center.
I tied some pink organdy ribbon around the lid and tied it to a bow on the front. I also tied two banners - one cut from pink patterned paper, that I also used on the inside of the box, and one cut from light green cardstock - that I had stamped a "greetings from the easter bunny" text with green ink onto to the bow.


Außerdem habe ich noch einen weißen Pompon als Schwänzchen an die Rückseite der Box geklebt.

I also attached a white pompom as a bunny's tail to the back of the box.


Und hier nochmal ein Bild der geöffneten Box. Drei der Seitenteile sind feststehend, die anderen drei öffnen sich, wenn man den Deckel abnimmt. 

And here I have the picture of the opened box for you again. Three of the sides stay standing, the other three pop open when the lid is taken off.


Ich habe eine knallig-pink farbene Sektdose in meine Box gestellt. 
Den Boden der Box habe ich aus grünem Cardstock gemacht, an die feststehenden Seitenteile habe ich Gras, gestanzt aus grünem Cardstock, angebracht. Dieselbe Bordüre habe ich auch einmal rund um die Dose gewickelt. So sieht es ein wenig aus wie ein Osternest. 
Die Seitenteile im Inneren habe ich alle mit rosa-weißem Designpapier mit Holzmuster beklebt. An den Seiten des Designpapiers waren Blumenranken - jeweils eine davon habe ich auf die linke und rechte aufklappende Seite geklebt.
 
I put a bright pink can of champagne inside my box.
The bottom of my box is made from green cardstock, I also attached some grass, die cut from green cardstock, to the bottom of the three sides that stay standing. I wrapped some of the same border around the bottom of my champagne can. Now it looks a bit like a easter basket.
I attached pieces of white and pink patterned paper with a wooden pattern to the insides of my box. There were flower borders at the edge of the patterned paper - I used these on the left and right opening panels.
 

 Auf das mittlere, sich öffnende Cardstockstück wollte ich eigentlich nur einen Gruß aufbringen. Das war mir dann aber irgendwie zu nackig. Und so habe ich hier doch noch ein kleines Motiv mit aufgeklebt. 
Die Ostereier sind aus dem Set Simply Celebrate Spring von LawnFawn, hinter das mittlere Osterei habe ich einen der Hasen aus dem Little Bunny Agenda Stempelset von MamaElephant gesetzt. Und hinter den Motiven befindet sich ein Reststück der Grasbordüre.
Darüber habe ich ein Stück weißen und rosa gematteten Cardstock geklebt, auf den ich mit grüner Tinte und Stempeln aus dem Set Schöne Ostern von Create a Smile einen Ostergruß gestempelt habe. 
Als Deko kamen dann noch ein weiteres Blümchen sowie drei weitere weiße Perlen zum Einsatz.

Onto the middle opening panel I only wanted to attach a greeting. But that looked way too plain. And so I decided, to add a little image here.
The easter eggs are from the Simply Celebrate Spring stamp set by LawnFawn, behind the center egg I put one of the bunnies from the Little Bunny Agenda by MamaElephant. And behind the images I placed a left over piece of the grass border.
Above that I adhered a white banner, matted pink, onto that I had stamped a "happy easter" with green ink.
To add a bit of decoration I used another little flower and three more pearls here.