Posts mit dem Label ColoradoCraft werden angezeigt. Alle Posts anzeigen

Samstag, 27. Juni 2026

Plant dreams, pull weeds...

 
Hallo Ihr Lieben!
Beim Aufräumen der im Flohmarkt erstanden Stempel von ColoradoCraft sind mir die Stempel zum Thema Gemüsegarten wieder in die Hände gefallen. Die kamen dann gleich auch mal wieder zum Einsatz. Das Ergebnis zeige ich Euch hier.

Hello everyone!
When I was putting away the ColoradoCraft stamps I recently bought in a de-stash group I came across their veggie garden related stamps and decided to use them. This is the card I made with them.
 
Meine Schwiegereltern hatten immer schon einen Schrebergarten, aber in den letzten Jahren fiel ihnen die Pflege immer schwerer. Als mein Schwiegervater jetzt Anfang des Jahres gestorben ist, blieb nichts anders, als den Garten aufzugeben. Für den Nachbesitzer habe ich diese Karte gemacht.
Der Hintergrund besteht aus einem Stück weißen Cardstocks, auf den ich quer eine Reihe Gras aus dem Set Greener Grass gestempelt. Den unteren Teil habe ich dann mit Distress Ink Twisted Citron, Mowed Lawn und Pine Needles gewischt, den Himmel mit Tumbled Glass und Mermaid Lagoon. Dann habe ich Wasser aufgespritzt.
Mittig aus dem Cardstock habe ich dann mit einem der Essential Modern Ovals von Spellbinders ein Oval ausgestanzt, schwarz hinterlegt und später wieder zurück an seinen Platz geklebt.
 
My in-laws always had  a little garden a few miles away from their house, but taking care of it was getting harder and harder for them. When my father in law died beginning of this year his mom just had to give up the garden. For the new owner I made this card.
The background is made from a piece of white cardstock that I stamped a grass border from Greener Grass across. I inked the bottom with Distress Ink Twisted Citron, Mowed Lawn and Pine Needles, the sky with Tumbled Glass and Mermaid Lagoon. Then I splattered some water on top.
From the center of the cardstock I cut an ovel using one of the Essential Modern Ovals by Spellbinders, matted it black and later glued it back in place.  


Der Hase war schon sehr erfolgreich mit der Gemüseernte. Er ist aus dem Set Garden Therapy. Ich habe ihn mit Copics coloriert und anschließend mit einem schmalen weißen Rand ausgeschnitten. Den Rand habe ich später passend zum Hintergrund eingefärbt, so dass er kaum mehr auffällt. 
Eigentlich wollte ich gar nicht viel mehr  auf die  Karte packen, sie sah aber doch zu leer aus. Also habe ich diverse Gemüse und Pflanzen aus dem Veg Out Hintergrund vor das Gras im Hintergrund gestempelt und über die Distress Inks coloriert. Deswegen sind die Farben auf der ganzen karte doch etwas kräftiger, als sonst von mir gewohnt. Von dem Hintergrund hatte ich mir damals gleich zwei gekauft - einen als Hintergrund, den anderen habe ich in lauter kleine Einzelmotive geschnitten. So kann ich die problemlos verwenden, ohne den Rest des Hintergrunds maskieren zu müssen. Bisschen verrückt, oder? Aber hier waren die vielen kleinen Motive perfekt. 
Unter dem Hasen, genau passend ins Oval, habe ich dann mit schwarzer Tinte den Text gestempelt. Er ist aus dem Set Veggie Stack und ich fand, er passt hier perfekt. Denn er drückt genau das aus, was der Garten für meine Schwiegereltern bedeutet hat - und das wünsche  ich auch dem neuen Besitzer. 
 
 This bunny was already very successful with harvesting his veggies. He's from Garden Therapy. I colored him with Copics and then cut him out with a very thin white edge around him. Later I colored that matching  the background so it's hardly visible. 
Originally I hadn't planned much more on the card, but that looked too plain. So I stamped different plants and vegetables in front of  the grass in the background  and then colored over the Distress Ink blending. That's also why the colors on this card are a lot brighter than you usually see from me. Back when they were released I had bought two of these backgrounds - one to use as a background, the other one I cut into a lot of individual images. This way I could use those smaller images without having to mask off the rest of the background. A bit crazy, right? But they made life a lot easier here.
Under the bunny, perfectly fitting the oval, I stamped my text with black ink. It's from Veggie Stack and I thought it's perfect here. It expresses what that garden meant to my in-laws and  that's what I wish the new owner it will mean to him, too. 
 

Oben am Himmel fliegt noch ein kleiner Vogel, der noch eine Erbse geerntet hat. Auch der ist aus dem Set Veggie Stack. 
Außerdem habe ich einige kleine weiße Wolken am Himmel verteilt. 
 
Up in the sky there's a little bird flying, delivering another pea he just harvested. It's again from Veggie Stack.
I also added some small white clouds to the sky. 


Auf dieser Karte habe ich nur den Vogel und den Hasen sowie die Zwiebeln und den Salatkopf mit 3D Tape hinterlegt. Als Deko habe ich dann noch ein paar kleine rosafarbene Herzen auf der Karte verteilt und dann alles auf einen weißen Kartenrohling geklebt.
 
On this card I only backed the bird and the bunny as well as the onions and the salad with foam tape. As dekoration I added some small pink clay hearts and then glued the card panel to a white note card.
 

Montag, 18. Mai 2026

Du bist großartig!

 
Hallo Ihr Lieben!
Vor kurzem habe ich in einem Flohmarkt zwei Stempelsets von ColoradoCraft erstanden, und eines davon kam hier zum Einsatz. Das andere war ein Weihnachtsset, das darf noch ein wenig im Schrank schlummern...

Hello everyone!
A little ago I bought two ColoradoCraft stamp sets in a destash group and one of them I used on this card. The other one is a christmas set, that will have to wait a little until it comes to a use...
 
Für den Hintergrund habe ich ein Stück Watercolor Cardstock per Ink Smooshing mit Distress Ink Tumbled Glass eingefärbt. Da nur das ein wenig fad ausgesehen hätte, habe ich einen Blumenhintergrund von SU - Breathtaking Bouquet - mit Distress Ink Hickory Smoke auf den getrockneten Cardstock gestempelt. Anschließend habe ich auch noch hellrosa Metallic Watercolor aufgespritzt.
 
For the background I did some ink smooshing with Distress Ink Tumbled Glass to color in a piece of watercolor cardstock. Just that would have been a bit too plain, so I used Distress Ink Hickory Smoke to stamp the Breathtaking Bouquet by SU - a large flower background - onto the dried cardstock. Then I also splattered some light pink metallic watercolor onto it. 


Das süße Motiv ist aus dem Set Bunnies and Robin. Ich habe es auf weißen Cardstock gestempelt und mit Ohuhu Markern coloriert. Die Tiere im Motiv sind im Stempelset auch als einzelne Motive enthalten. Ich habe den Hasen links und den in der Mitte jeweils nochmal abgestempelt, coloriert und genau an der Stempellinie ausgeschnitten. Die habe ich später dann mit 3D Tape wieder an Ort und Stelle geklebt. Für den Himmel habe ich versucht, das fleckige des Ink Smooshings auf dem Hintergrund etwas nachzuahmen. 
Mit der zweitgrößten der Nesting Piercing Tickets Stanzen von WaffleFlower habe ich einen Rahmen aus hellblauem Cardstock gestanzt und um das Motiv gesetzt, hinterlegt mit dickem 3D Tape.  
Zwei Ecken des Rahmens habe ich dann noch mit Blumen dekoriert. Die sind aus dem Set Corner Flowers von MamaElephant. Die Blumen oben links sind so als Stempel im Set enthalten, das kleinere Arrangement unten rechts habe ich aus einzelnen Blüten zusammengesetzt. 
 
The cute image is from Bunnies and Robin. I stamped it onto white cardstock and colored it with Ohuhu markers. The animals are in the set as individual stamps as well. I stamped the bunny on the left and the one in the middle again, colored them and then cut them out right along the stamped edge. Later I glued those back in place using foam tape. For the sky I tried to mimic the splotchy look of the ink smooshing in the background.
Using the second largest of the Nesting Piercing Tickets by WaffleFlower I cut a frame from light blue cardstock and put it around the image, backing it with thick foam tape.
I then decorated two corners of the frame with flowers. Those are from Corner Flowers by MamaElephant. The flowers in the top left are an image from the set, the smaller arrangement on the bottom right I put together from individual flowers.  


Nun brauchte meine Karte noch einen Text - da passte "ein Vögelchen hat mir gezwitschert" aus dem Set Birdie von CreativeDepot super. Ich habe ihn weiß auf schwarzen Cardstock embosst und dabei die Anordnung der Worte etwas verändert. So konnte ich ihn entlang der linken und unteren Kante des Rahmens ankleben. Den zweiten Teil habe ich dann einfach darunter gesetzt.
 
Now my card needed a text - the "a little birdie told me" seemed fitting. I white heat embossed it onto black cardstock and then glued it along the left and bottom edge of the frame. The rest of the text - "you are wonderful" - I just put underneath. 


Auch die Texte und Blumenecken sind wieder mit 3D Tape hinterlegt. 
Als Deko habe ich auf den Hintergrund mit einem schwarzen Fineliner einen Rahmen aufgemalt und einige kleine weiße Herzen auf der Karte verteilt.
Zum Schluss habe ich alles auf einen weißen Kartenrohling geklebt.
 
The texts and flower corners I backed with foam tape again.
As decoration I drew a frame with a black fineliner onto the background, then I added some white clay hearts to the card.
As the last step I glued the card panel to a white note card. 

Dienstag, 7. April 2026

Shaker-Card in Autoform

 
Hallo Ihr Lieben!
Heute habe ich eine Karte voller Kleeblätter, das ganze in Auto-Form und mit eingebautem Shaker. Klingt kompliziert, ist es aber gar nicht. ;)
 
Hello everyone!
Today I have a card full of clovers to share, in a car shape and with a shaker. Sounds complicated, but it actually isn't. ;)
 
Für den Pick-Up habe ich das Stempelset PickUp Tailgate von HoneyBeeStamps benutzt, den habt Ihr hier bei mir ja schon öfter gesehen. Ausgestanzt habe ich ihn mit der passenden Stanze. Es gibt den PickUp auch von vorne - beide sind von der Form her identisch. Also habe ich eigentlich die Stanze zu eben diesem PickUp Cab verwendet. 
Die Karte ist auch die erste, bei der ich das komplette Motiv mit den Ohuhu Markern coloriert habe. Ja, ich lerne noch, aber ich wollte den PickUp in dezenten Farben und leuchtend grüne Kleeblätter. Und ich bin mit dem Ergebnis sehr zufrieden. 
 
For the pick up I used the PickUp Tailgate stamp set by HoneyBeeStamps, I've used that several times already. I cut it out with the matching die. Actually, this car is availbale as a front and a rear view, both are identical in shape. So I used the die from the matching die set for this PickUp Cab. 
This card is also the first one, where I used only Ohuhu Marker for the coloring. Yes, I am still learning how to combine them, but I wanted this PickUp to have a subtle color with bright green clovers. And yes, I am happy with the result.  
 

 Die Ladefläche des PickUps habe ich dann mit vielen Kleeblättern gefüllt. Dafür habe ich die Klee-Wiese aus dem 4 Leaf Clover Set von ColoradoCraft benutzt. Den kleinen Hamster, der eigentlich darin sitzt, habe ich wegmaskiert und durch dieses Häschen aus Dandelion Wishes von MamaElephant ersetzt. Der Hamster war einfach zu groß - außerdem habe ich den erst vor gar nicht langer Zeit benutzt. Die Pusteblume, die der Hase eigentlich in der Hand hält, habe ich dann durch das Kleeblatt ersetzt, das der kleinere Hamster aus dem 4 Leaf Clover Set in der Hand hält. 
Die Fläche zwischen den Kleeblättern habe ich dunkelgrün coloriert und sie dann mit kleinen Kleeblatt-Konfetti sowie winzigen hellgrünen Perlen gefüllt. 
 
I filled the bed of the truck with lots of clovers. I used the clover field from 4 Leaf Clover by ColoradoCraft for them, masking off the hamster, that's sitting in it. I replaced that with the little bunny from Dandelion Wishes by MamaElephant - the hamster was just too large. And I had just used them not too long ago. I replaced the dandelion, that the bunny is holding, with the clover the smaller hamster from 4 Leaf Clover is holding up.
I colored the area betweenthe clovers in a dark green and then filled it with some small clover confetti and tiny light green pearls.
 

 Den Shaker habe ich in die Klappe der Ladefläche des PickUps eingebaut. Dafür habe ich den unteren Teil des PickUps erneut abgestempelt und nur die Kotflügel, die Klappe und die Stoßstange entlang der Stempellinien ausgeschnitten. Außerdem habe ich ein Fenster in die Klappe geschnitten. 
Hinter das Fenster habe ich Folie gesetzt, auf die ich den Text weiß aufembosst habe. Der ist aus dem Set PickUp Cab. Ergänzt wird er dann durch das "good luck" auf dem Nummernschild, das wieder aus PickUp Tailgate ist. 
Diesen Teil des Autos habe ich dann mit 3D Tape auf das komplette Auto geklebt und den Shaker dabei mit weiteren kleinen Kleeblättern sowie winzigen silbernen Perlen gefüllt. Den Bereich hinter dem Shaker, der sich auf dem kompletten Auto befindet, habe ich dunkelgrün coloriert. 
 
I built the shaker in the tailgate of the PickUp. I stamped the lower part of the car again and cut out only the fenders, the tailgate and the bumper, right along the stamped lines. I also cut a window into the tailgate.
I put some acetate behind the window and white heat embossed the text onto it. The text here is again from PickUp Cab. I stamped the rest of the text onto the license plate - this text is again from PickUp Tailgate.
I glued this part of the car onto the complete on using foam tape and filled the shaker with more of the small clover confetti and some tiny silver beads. The area behind the shaker, that is actually part of the complete car, I colored a dark green. 
 

Auf die Kotflügel und neben das Nummernschild habe ich dann noch einige weitere Kleeblätter angeklebt und außerdem drei hellrosa Herzen als Deko auf die Karte geklebt. Das Häschen ist übrigens mit dünnem 3D Tape aufgeklebt, so dass es zwar etwas erhöht, aber nicht so hoch wie die Ladefläche mit dem Shaker ist.
 
I added some more of the clover confetti to the fenders and next to the license plate and also glued down three light pink clay hearts as decoration. The bunny I adhered with thin foam tape. This way it's raised a bit but not as much as the clovers and shaker.
 

 Auch die Karte hinter dem Auto ist in Auto-Form gestaltet. Ich habe es dafür aus  oben gefaltetem, weißem Cardstock gestanzt und die Stanze dabei so aufgeklebt, dass die obere Kante der Stanze etwa 1 cm über den Cardstock hinausragt. Auf diese Auto-Karte habe ich dann das dekorierte Auto aufgeklebt.
 
The card behind the car is also made in the shape of the car. I simply cut it again from a top folding note card, moving the die up a bit. This way the top edge is outside the card base and the fold doesn't get cut. Then I glued the decorated car onto the car shaped card base.
 

Sonntag, 15. März 2026

Toi, Toi, Toi!


Hallo Ihr Lieben!
Inzwischen haben wir ja so einige Feste aus den USA - und anderen Teilen der Welt - übernommen, St. Patrick's Day wird für mich aber nie dazu gehören. Trotzdem haben mich all die Kleeblätter, die man momentan auf Karten sieht, inspiriert und ich habe sie auf diese frühlingshafte Karte gepackt.
 
Hello everyone!
We in Germany have taken in quite some holidays from the US - and other parts of the world. But to me St. Patrick's Day will never be one of them. But I still got inspired by all the shamrock cards I've seen lately and put some on this spring card.
 
Als Basis diente hier ein Stück Watercolor Cardstock, dessen Mitte ich per Ink Shmooshing mit Distress Ink Salty Ocean hellblau eingefärbt habe. Vor einiger Zeit habe ich einVideo gesehen, ich weiß nicht mehr von wem, in dem eine Art Knödel aus Zewa gemacht wurde, der dann in Folie gepackt wurde. Die Enden werden zu einem kleinen Griff gedreht. Damit wurde dann die mit Wasser verdünnte Tinte aufgetragen, was dann viel kontrollierter geht, als auf die herkömmliche Art. Ihr wisst ja, ich bin ein Kontrollfreak. Aber so macht auch mir das Ink Smooshing super viel Spaß - und 100 % kontrollierbar ist es trotzdem nicht.
Auf den hellblau eingefärbten Bereich habe ich nach dem Trocknen noch hellrosa Metallic Watercolor aufgespritzt.
 
I used a piece of watercolor cardstock as the base here and colored its center a light blue by doing ink smooshing with Distress Ink Salty Ocean. A while ago I saw a video, and once again I don't remember who made it, where they made a ball from a paper towel and covered that with thin plastic. The ends were twisted and formed some kind of small handle. This was used to apply the watered down ink and that was so much more controllable than the usual way of doing ink smooshing. You know me, I am a control freak. But done like that even I can enjoy it, and it's still not completly controllable.
After the background had dried I splattered some light pink metallic watercolor onto the blue area.
 

 Die Wiese samt dem Klee habe ich dann mit dem Lots of Luck Stempelset von SimonSaysStamp gestaltet. Ich habe alles mit verschiedenen Stempelkissen von MFT und SU auf weißen Cardstock gestempelt und per Hand ausgeschnitten. Und weil das Gras nicht ganz bis an den Rand der Karte reichte, habe ich rechts und links noch etwas davon direkt auf den Hintergrund gestempelt.
Und dann fiel mir das 4 Leaf Clover Stempelset von ColoradoCraft in die Hände. Der kleine Hamster, der stolz das gerade gefundene vierblättrige Kleeblatt in die Luft reckt, war doch das perfekte Motiv für meine Wiese. Ich habe es mit dem NoLine Kissen von InkOn3 abgestempelt umd mit Copics coloriert. Ich wollte lieber eine kleine Maus statt eines Hamsters, also habe ich Grautöne gewählt und beim Colorieren die Ohren minimal vergrößert. Für die Details habe ich dann Polychromos eingesetzt, die Highlights auf allen Motiven sind mit einem weißen Gelstift gemacht. Auch dieses Motiv habe ich ausgeschnitten und die Kleewiese, in der der Hamster eigentlich sitzt, dabei weggeschnitten. 
 
I created the meadow with the clovers using the Lots of Luck stamp set by SimonSaysStamp, stamping it with different inks by MFT and SU onto white cardstock. Then I cut the image out by hand. And because the grass didn't reach to the edge of my background I simply stamped some more of it directly onto the watercolor cardstock. 
And then I came across the 4 Leaf Clover set by ColoradoCraft. This little hamster, that's proudly holding up the shamrock he just found, was the perfect image for my meadow. I stamped it with the NoLine ink pad by InkOn3 and colored it with Copics. I wanted a mouse instead of a hamster, so I went with greys and made the ears a tad bit larger. For the details I brought in my Polychromos, the highlights on all the images are made with a white gel pen. I cut this image out with my scissors again, cutting off the field of clovers this hamster is originally sitting in. 
 

 Für die Texte kamen dann Produkte von Create a Smile zum Einsatz.
Der gestanzte Text ist mit dem Set Liebe Grüße mit zweierlei Schatten gemacht. Ich liebe die Bordürenstanze, deren Kante der oberen Linienführung der gestanzten Worte entspricht. Ich habe sie hier aus weißem Cardstock gestanzt und darauf dann die Worte, gestanzt aus grünem Cardstock, aufgeklebt. 
Die gestempelten Texte sind aus dem Set Glücksbringer und jeweils weiß auf dunkelgrünen Cardstock embosst. Einen dieser Texte habe ich unter den gestanzten Text, den anderen oben links auf den Hintergrund geklebt.
 
For the texts I used products by Create a Smile.
The die cut text is made with the Liebe Grüße mit zweierlei Schatten set. I love the border die, that matches the top edge of the die cut words. I cut it from white cardstock and glued the individual words, cut from green cardstock, onto it.
The stamped texts are from Glücksbringer and white heat embossed onto dark green cardstock. I adhered one of them under the die cut words, the other one to the to left of the background.
 

 Die Wiese mit dem Klee ist direkt auf den Hintergrund geklebt. Die Maus ist mit dünnem, der Cardstockstreifen mit dem gestanzten Texte mit dickem 3D Tape angebracht. Beim Kleeblatt, das die Maus hochhält, habe ich  nur die Blätter mit dickem 3D Tape hinterlegt, so dass das etwas weiter hervorsteht. Und auch den Text oben auf der Karte habe ich damit aufgeklebt.
Als Deko habe ich dann ein paar kleine rosafarbene Herzen auf der Karte verteilt und dann alles auf einen weißen Kartenrohling geklebt.
 
I glued the meadow with the clover directly onto the background. I backed the mouse with thin, the cardstock strip with the die cut text with thick foam tape. I put a piece of that just behind the shamrock, the mouse is holding, to make it stand up a bit more. And I also put thick foam tape behind the text strip in the top left of the card.
I added some pink clay hearts as decoration and then adhered the card panel to a white note card.
 

Mittwoch, 11. März 2026

Happy Spring Day


Hallo Ihr Lieben!
Also so langsam dürfte der Frühling mal kommen, ich bin mehr als bereit und sehne mich nach Sonnenschein und wärmeren Temperaturen. Zur Einstimmung habe ich heute schon mal eine Frühlingskarte für Euch.
 
Hello everyone!
Spring could really make its appearance now, I am more than ready and yearn for sunshine and warmer temperatures. To get a bit in a spring mood I have a spring card for all of you today.
 
Der Hintergrund meiner Karte ist aus einem Stück blauen Cardstocks gemacht, den ich von unten her ein wenig mit Distress Ink Salty Ocean gewischt habe. 
Da meine Hasen eine schöne Landschaft brauchten, hatte ich die Idee, eine Art "Tunnel" aus frühlingshaften Büschen zu machen. Ich kenne diese von Pflanzen überwucherten Gänge noch von früher. Wolkenstanzen boten sich da natürlich an. Ich habe die beiden großen Stanzen aus dem Cloudy Sky Scene Set von HeroArts aus zwei verschiedenen Tönen hellgrünen Cardstocks gestanzt und dann mit Copics mit kleinen Punkten coloriert. Damit es auch aussieht wie Büsche habe ich dann noch einige feine Äste aus dem Branching Out Set von Memorybox aufgeklebt, hier reichten jeweils die Spitzen der Äste. 
 
I created the background for my scene from blue cardstock that I inked from the bottom up with a bit of Distress Ink Salty Ocean.
My bunnies needed a nice spring-ish landscape and I got the idea of creating some kind of "tunnel" from bushes. I remember those overgrown by plants ways from back then. Cloud dies seemed perfect. I used the two large ones from Cloudy Sky Scene by HeroArts and cut them from two different shades of light green cardstock. Then I colored them with Copics by just covering them with lots of little dots. And to make sure these look like bushes I added a few branches from Branching Out by Memorybox, only using the very tips of the branches.
 

Eigentlich wollte ich ein ganz anderes Motiv aus dem Schrank holen - die Karte damit zeige ich Euch demnächst - und bin dabei über die süßen Hasen aus dem Happy Day Set von ColoradoCraft gestolpert. Ganz spontan habe ich mich dann umentschieden... 
Ich habe sie mit dem Jellyfish Kissen von LawnFawn gestempelt und dann mit Copics coloriert. Zum Schluss habe ich dann mit einem schwarzen Fineliner die Schnurrhaare und Augen aufgemalt und außerdem einige Details mit Polychromos hinzugefügt.  
Das Gras hinter und neben den Hasen habe ich mit dem Greener Grass Set von ColoradoCraft gemacht. Ich habe die Hasen maskiert und die Grasbüschel direkt mit auf den selben Cardstock gestempelt. 
 
I wanted to bring out a completly different image - I will share the card I made with that a bit later in the month - and came across the cute bunnies from Happy Day by ColoradoCraft. That made me change my mind...
I stamped the images with the Jellyfish ink by LawnFawn and colored them with Copics. Then I used a black fineliner to add the eyes and wiskers and also added a few small details with Polychromos.
The grass behind and next to the bunnies is made with the Greener Grass set by ColoradoCraft.  I masked the bunnies off and stamped the grass onto the same piece of cardstock.
 

 Beim Abstempeln der Motive hatte ich noch nicht so genau im Kopf, wie die Karte dann am Ende aussehen sollte - und hatte unter den Motiven tatsächlich nicht genug Platz für meinen Text. Ich wollte unbedingt die Spring-Stanze aus dem Great Greetings Spring von HoneyBeeStamps benutzen und das braucht dann doch einiges an Platz. Also habe ich aus hellgrünem Cardstock noch eine Grasbordüre ausgestanzt und die als zusätzliche Lage unter die Motive gesetzt. Damit sie zum Rest des Grases passt, habe ich auch den Cardstock ein wenig mit Copics schattiert. 
Das Wort Spring ist einfach aus weißem Cardstock gestanzt. Das "happy" und das "day" habe ich dann weiß aufembosst, beides ist ebenfalls aus dem Happy Day Set. 
Und damit das Gras hier nicht so langweilig wirkt, habe ich noch kleine Osterglocken aus dem Small Daffodils in Pot Set von Gummiapan in die Wiese gepflanzt. Auch die habe ich aus weißem Cardstock gestanzt und mit Copics coloriert. Die Blumenzwiebeln am unteren Ende habe ich einfach weggeschnitten. 
 
When stamping the images I didn't know yet, what exactly I wanted my card to look like - and didn't leave enough room for the text under them. I really wanted to use the spring word die from Great Greetings Spring by HoneyBeeStamps, and that needs quite some space. So I die cut a grass border from light green cardstock and added it as an additional layer under the images. To make this layer go with the rest of the grass layers I shaded the cardstock with some Copics.
The word spring I simply cut from white cardstock.  The words "happy" and "day" I then white heat embossed onto the cardstock, both words are from Happy Day, too.
The grass layer looked a bit plain with just the text on it. So I added some daffodils from Small Daffodils in Pot by Gummiapan. Again I cut them from white cardstock and colored them with Copics and cut off the bulbs at the bottom.
 

 Damit der Busch-Tunnel auch schön plastisch wirkt, habe ich die Wolken-/Buschlagen jeweils mit dickem 3D Tape hinterlegt. Die Hasen sind direkt auf dem Himmel befestigt, die extra Graslage habe ich mit dünnem 3D Tape aufgeklebt. 
Zum Schluss habe ich noch  drei kleine weiße Wolken am Himmel verteilt und alles auf einen weißen Kartenrohling geklebt.
 
To make the tunnel of bushes dimensional I added the clouds/bushes with thick foam tape. The bunnies I glued directly onto the sky, the extra layer of grass I backed with thin foam tape.
At the end I added three small clouds to the sky and adhered the card panel to a white note card.
 

Samstag, 14. Februar 2026

Love is in the Air


Hallo Ihr Lieben!
Eigentlich bin ich ja der "Schmeiß-die-Reste-Weg-Typ". Aber auf dieser Karte kamen einige Elemente zum Einsatz, die ich tatsächlich einige Zeit aufgehoben hatte, mit dem Ziel, sie auf einer Karte zu verarbeiten. Und das habe ich dann auch tatsächlich getan, sogar zwei verschiedene Reste. 
 
Hello everyone!
I am the "throw-away-those-leftovers" type of crafter. But on this card I used some elements that I had lying on my desk because I might be able to use them on another card. That's what happened, and I even used two different types of leftovers.
 
Ihr ahnt es bestimmt - es sind die roten Herzen und die Punkte aus silbernem Metallic-Cardstock. Ich weiß gar nicht mehr, von welchen Karten sie übriggeblieben waren, sie lagen doch einige Zeit auf meinem Tisch. Bevor sie mich so stören, dass sie doch noch im Müll landen, habe ich ganz bewusst eine Karte damit gemacht, die tatsächlich auf den Resten aufgebaut ist.
Der Hintergrund besteht aus einem Stück hell-türkis farbenen Cardstock, in den ich mit dem Head in the Clouds Embossingfolder von Spellbinders Wolken eingeprägt habe. 
Mit Copics habe ich unter die Wolken jeweils einen Schatten gemalt und oben auf die Wolken Highlights mit einem weißen Gelstift aufgemalt. Das lässt sie noch plastischer wirken. Dann habe ich feine Spritzer weißer Acrylfarbe aufgetragen.
 
You might already have guessed it - the leftovers are the red hearts and the dots made from silver metallic cardstock. I even don't remember, what cards those were left over from, they were on my desk for quite some time. So before I get sick of them and they and up in the trash, I decided to use them and really  started the whole card with these.
The background is made from a piece of light aqua cardstock, that I dry embossed some clouds into using the Head in the Clouds Embossinfolder by Spellbinders.
I used Copics to draw a shadow under each cloud and a white gel pen to add some highlights. This makes them look even more dimensional. Then I added fine splatters of white acrylic paint on top.
 

 Die Herzen und Punkte habe ich dann im oberen Bereich der Karte alls Streifen schräg aufgeklebt, so als würden sie über den Himmel fliegen. Auf die  Herzen habe ich etwas klaren Nuvo Aqua Shimmer aufgetragen und dann klar-irisierende Glitzersteine zwischen und auf den Herzen verteilt. 
 
I glued the hearts and dots as a strip across the top of the background, just like they are floating by in the sky. I added a hint of a clear Nuvo Aqua Shimmer to the hearts and then put clear iridescent rhinestones on and between the hearts.
 

 Unten auf die  Karte habe ich dann eine Maus aus dem Falling Star Set von ColoradoCraft aufgeklebt. Die sreckt beide Arme nach oben, so als würde sie eines der Herzen fangen wollen. 
Die Maus ist mit Copics coloriert, auf die Nase habe ich Glossy Accents aufgetragen. Dann habe ich sie per Hand ausgeschnitten.
Hier unten befindet sich auch der Text meiner Karte. Das Wort love habe ich mit der Swirled Love Stanze von Poppystamps gemacht. Es besteht aus drei Lagen schwarzen Cardstocks mit einer leicht versetzten roten Lage obenauf. Den Schnörkel am Ende des E habe ich entlang des Rands der Kante weggeschnitten. Auf die rote Lage habe ich wieder etwas von dem klaren Nuvo Aqua Shimmer aufgetragen.
Das kleinere "is in the air" darunter  ist aus dem Spring Stempelset von HoneyBeeStamps und weiß auf schwarzen Cardstock embosst. 
 
At the bottom of the card I added a mouse from Falling Star by ColoradoCraft. She's putting both her arms up in the air, just like she wants to catch one of the hearts.
I colored the mouse with Copics and put some Glossy Accents onto the nose. Then I cut her out with my scissors.
Down here I also added the text to my card. The word love is made with the Swirled Love die by Poppystamps. I built it from three black layers with a red layer a bit offset on top. The swirl  at the end of the e I cut off along the edge of the background. Again I applied some of the clear Nuvo Aqua Shimmer to the red  layer.
The smaller "is in the air" under it is from the Spring stamp set by HoneyBeeStamps and white heat embossed onto black cardstock.
 

 Die silbernen Punkte sind direkt, die Herzen mit dünnem 3D Tape auf den Hintergrund geklebt. Hinter die Maus und dem embossten Text habe ich dickes 3D Tape angebracht.
Zum Schluss habe ich alles auf einen weißen Kartenrohling geklebt.
 
I glued the silver dots directly, the hearts with thin foam tape onto the background. The mouse and the embossed text I adhered with thick foam tape.
Then I glued the card panel to a white note card.
 

Samstag, 12. Juli 2025

Bloom with Happiness


Hallo Ihr Lieben!
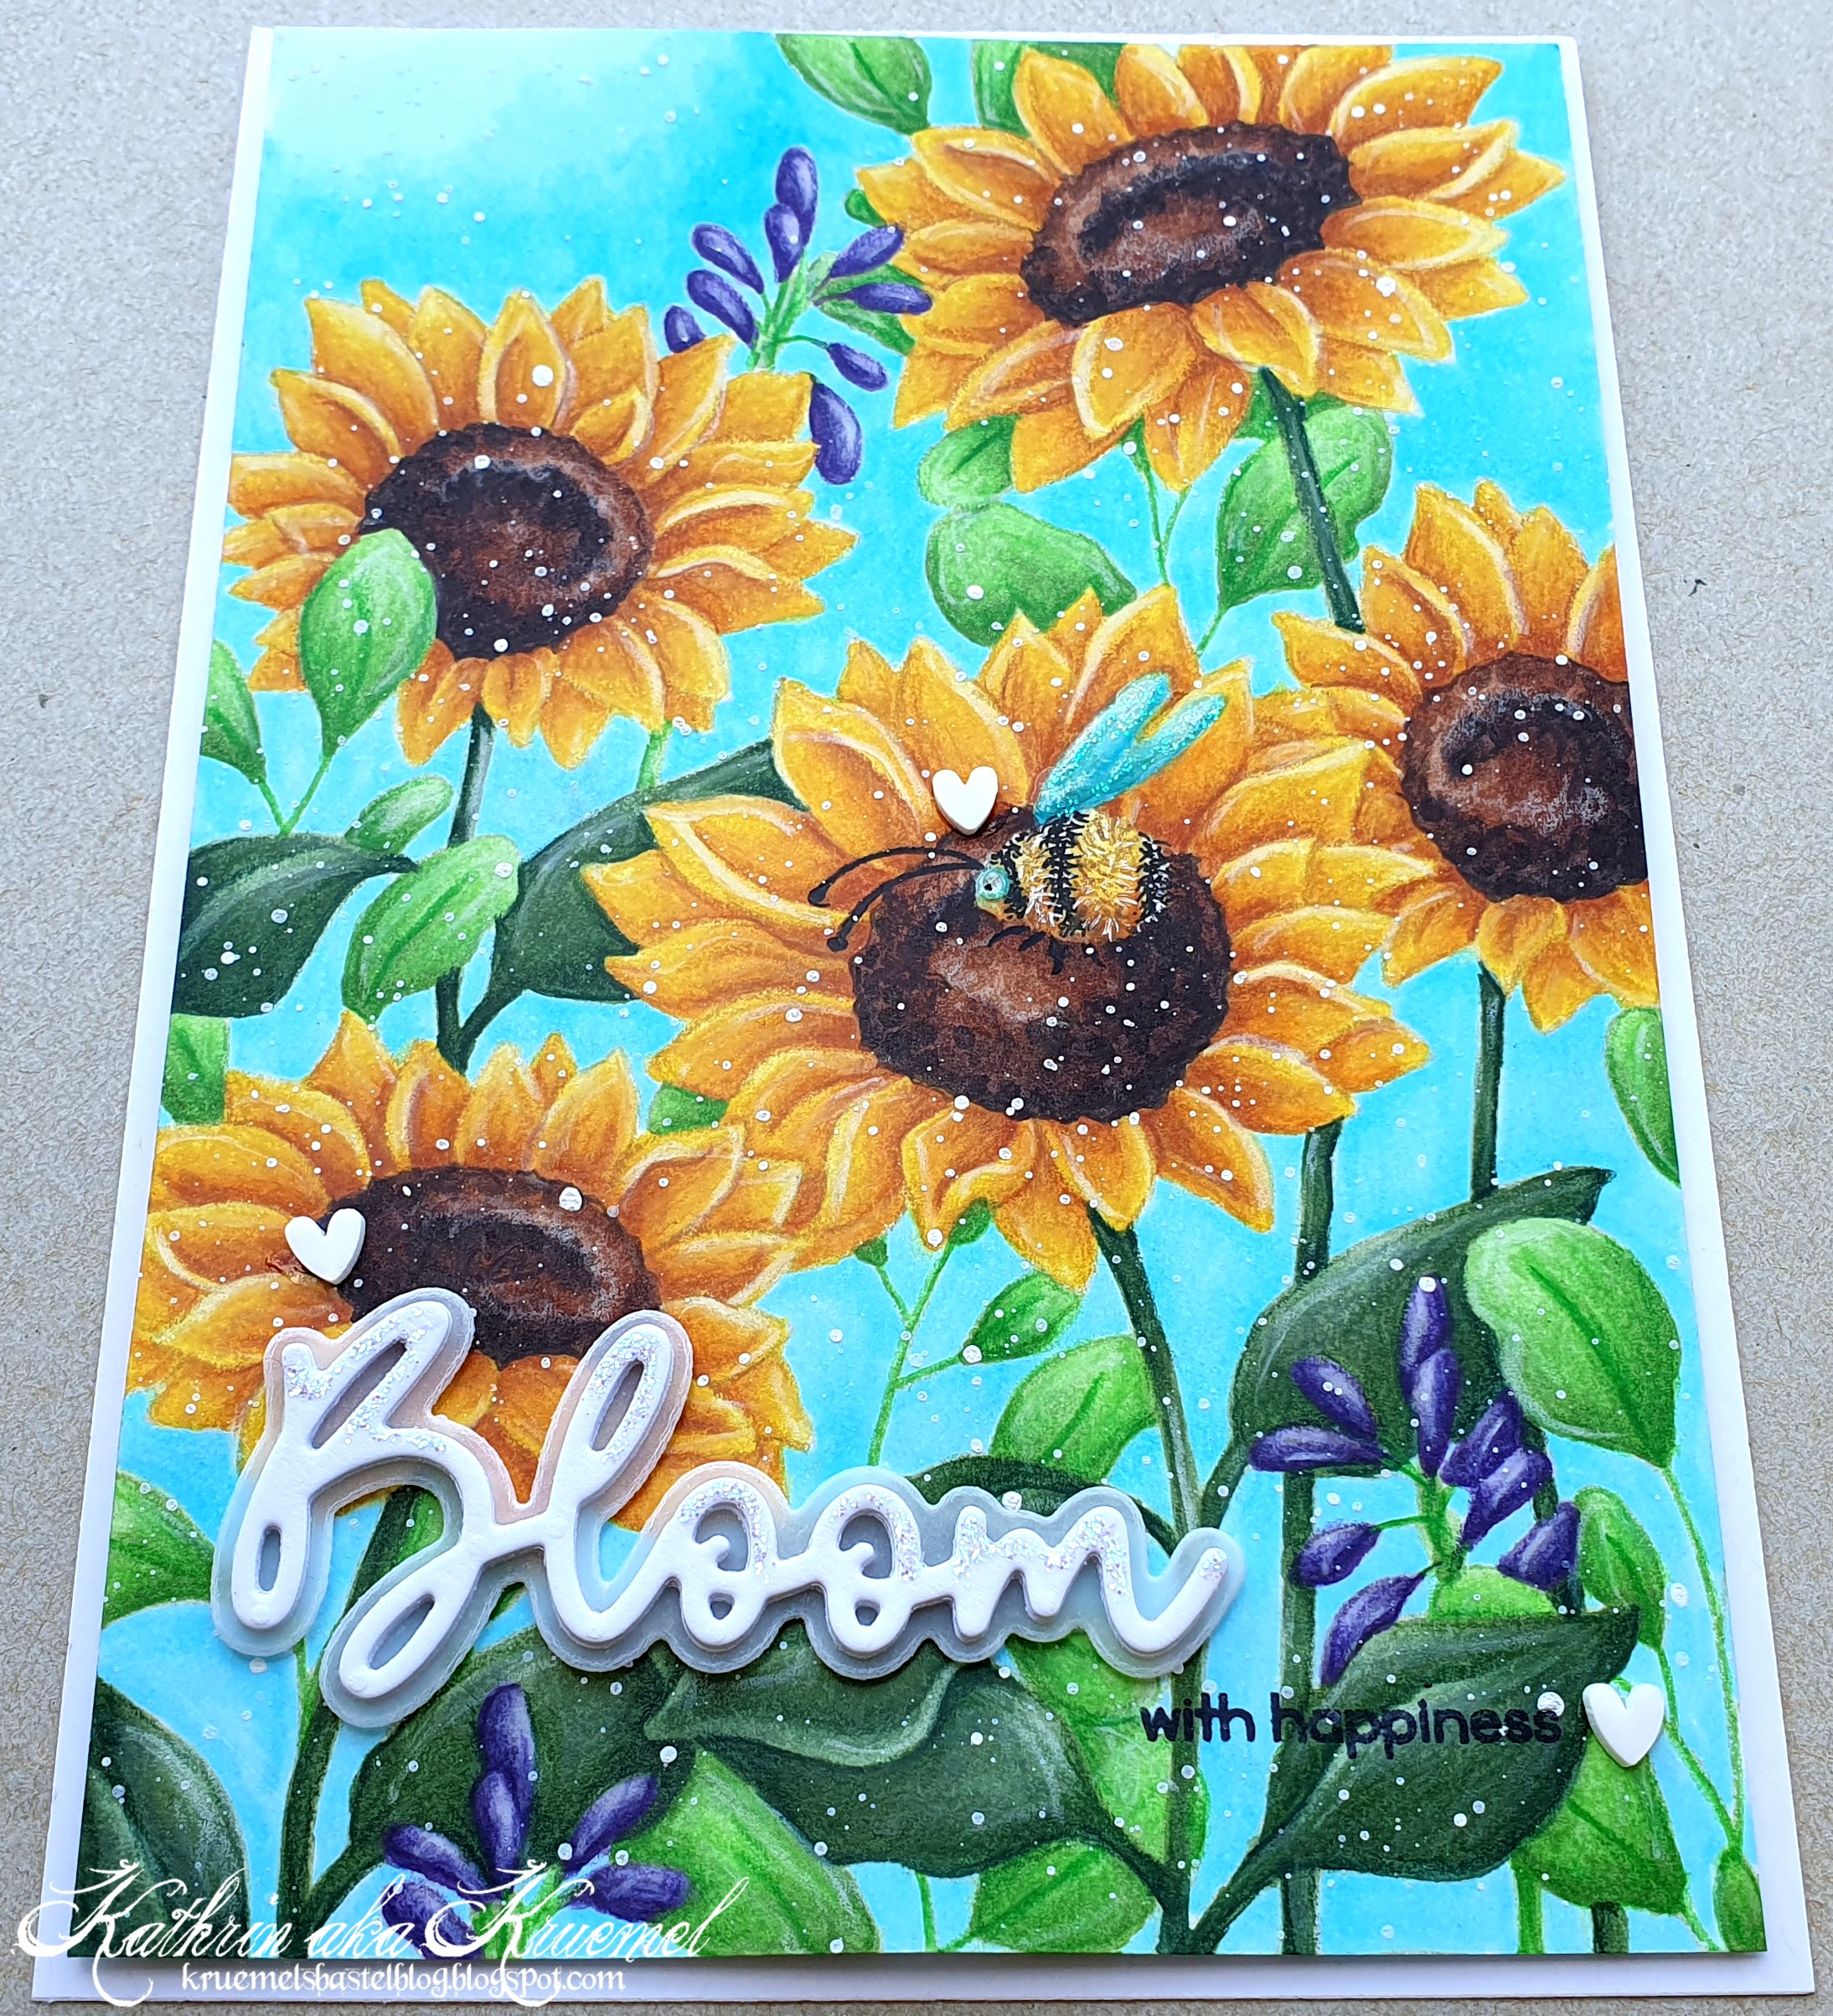
Eigentlich verbindet man mit Sonnenblumen ja eher den Herbst, aber auf dem Weg zu/von der Arbeit fahre ich momentan an einigen leuchtenden Sonnenblumenfeldern vorbei. Und die waren dann auch die Inspiration für meine heutige Karte.
 
Hello everyone!
Usually we have fall in mind when we think of sunflowers. But on my way to/from work I am passing a few bright sunflower fields right now. And those were the inspireation for today's card.
 
Das Sunflower Garden Stempelset von SimonSaysStamp hatte es mir schon länger angetan, der Stempel ist einfach wundervoll. Und zudem riesig - auf meine normal große Karte hat er bei bestem Willen nicht komplett gepasst. Aber so kann man mit dem selben Motiv, je nach Wahl des Ausschnitts, immer unterschiedliche Karten designen (oder mit einem gestempelten Motiv gleich zwei Karten füllen). 
Ich habe hier einen Ausschnitt des Motivs auf ein Stück weißen Cardstocks gestempelt - und da ich in No-Line Technik colorieren wollte dafür das Jellyfish Stempelkissen von LawnFawn benutzt.
 
I have been eyeing with the Sunflower Garden stamp set by SimonSaysStamp for quite some time, it's such an amazing image. And also gigantic - it will never fit completly onto a regular sized card. But this way you can create differently looking cards with the same image, depending on what portion of the image you use (or even fill two cards with just one stamped image).
I picked a part of the image and stamped it onto white cardstock, using the Jellyfish ink pad by LawnFawn because I wanted to do some no-line coloring.
 

 Auf eine der Blumen habe ich noch eine kleine dicke Biene aus dem Bee You Stempelset von ColoradoCraft gestempelt - ebenfalls mit dem Jellyfish Stempelkissen. 
Zum Colorieren habe ich dann Copics verwendet und ganz zum Schluss einige feinere Details/Linien mit Polychromos hinzugefügt. Auch den Hintergrund habe ich mit hellblauen Copics eingefärbt - weiß war mir irgendwie zu langweilig. 
Nach dem Colorieren habe ich über den Cardstock ganz fein und eher sparsam weiße Acrylfarbe aufgespritzt.  
 
I stamped a little chunky bee from Bee You by ColoradoCraft onto one of the sunflowers - again using the Jellyfish ink pad.
To color the image I used my Copics and brought in some Polychromos at the very end to add some fine details/lines. I also filled the background with a light blue Copic - white just looked too plain and boring to me.
After I had finished the coloring I added - not too much - fine splatter of white acrylic paint.
 

 Für den Text habe ich ein "bloom" samt Shadow Layer aus dem Great Greetings Spring Stanzenset von HoneyBeeStamps verwendet. Die Schattenlage ist aus Vellum gestanzt, das Wort Bloom habe ich sechsmal aus weißem Cardstock gestanzt. Je 3 davon befinden sich hinter und auf dem Vellum.
Ergänzt wird der Text durch ein winziges "with happiness", das ich mit schwarzer Tinte direkt auf das Motiv gestempelt habe. Ich gebe zu, es ist etwas schwer sichtbar, auch weil es so klein ist. Es ist ein Teile eines Textes aus dem Sunflower Garden Stempelset. Aber ich wollte so wenig wie möglich des Motivs verdecken.
 
For the text I die cut the word "bloom" and its shadow layer from Great Greetings Spring by HoneyBeeStamps. The shadow layer I cut from vellum, the word bloom I cut six times from white cardstock. Three each are stacked under and on top of  the vellum. I completed the text with a tiny "with happiness", that I stamped with black ink directly onto the image. I have to admit, that it's really hard to see, also because it is so small. It's part of a larger/longer text from the Sunflower Garden Set. I really wanted to cover as little of the image as possible.
 

Auf die oberen Enden des Wortes Bloom sowie die Flügel der Biene habe ich Stickles aufgetragen, die Flügel und das Auge der Biene habe ich außerdem mit Glossy Accents überzogen.
Als Deko habe ich drei kleine weiße Herzn auf der Karte verteilt und dann alles auf einen weißen Kartenrohling geklebt.
 
I applied Stickles to the top edge of the word bloom and the bee's wings, her wings and eye I also covered with Glossy Accents. 
I glued three white clay hearts onto the image and then adhered the card panel to a white note card. 
 

Mittwoch, 18. September 2024

Congrats, you did it!

 
Hallo Ihr Lieben!
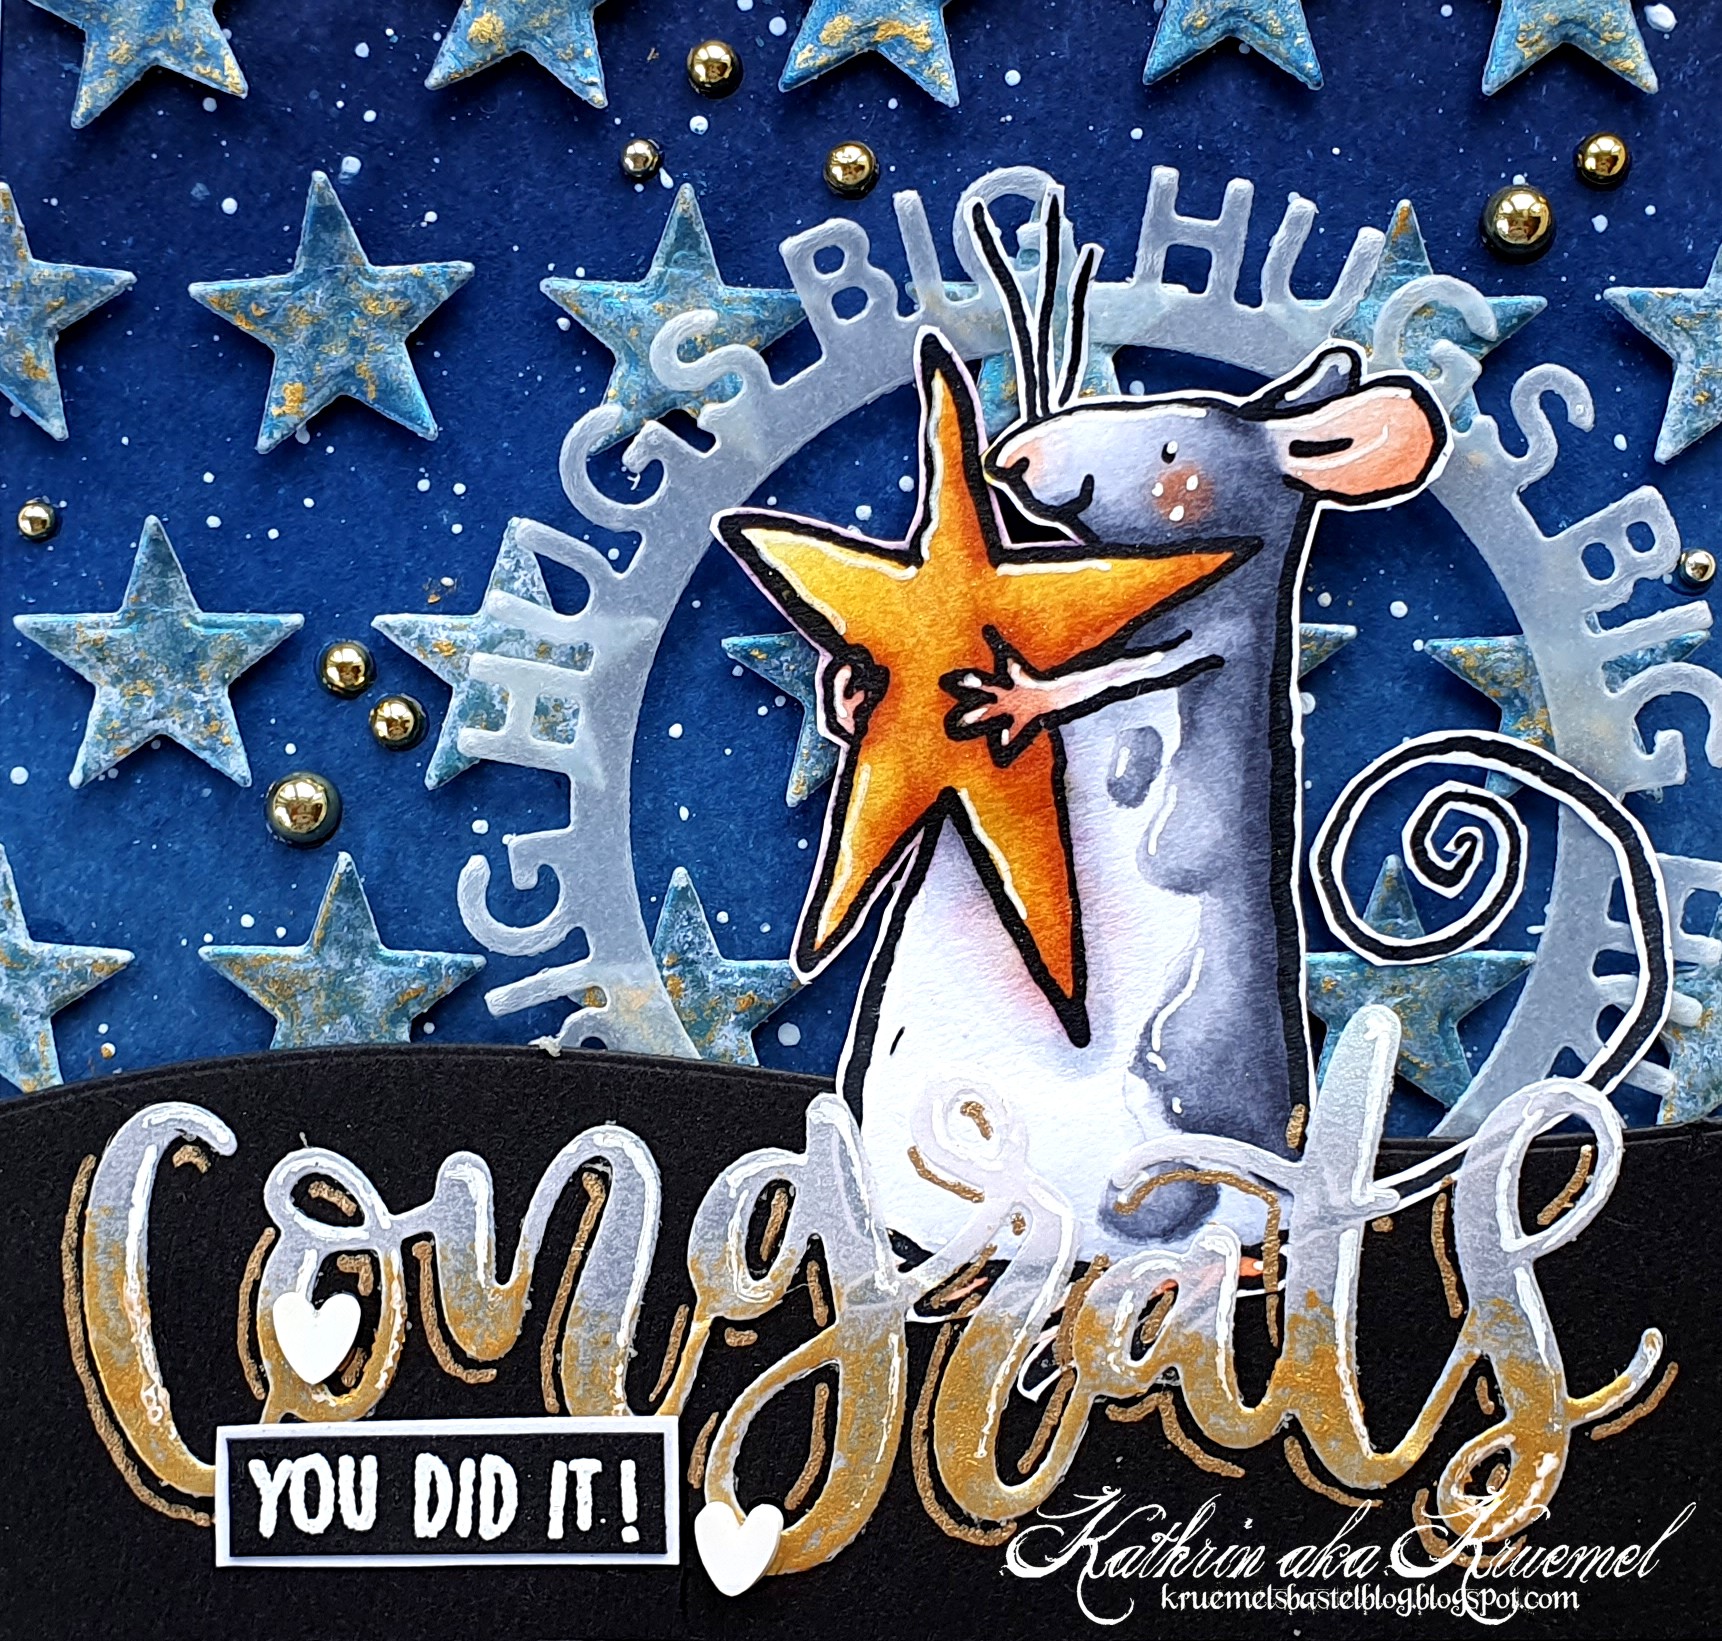
Ich hatte sie ja schon angekündigt - die Karte mit all den schimmernden Sternen, die mal wieder übrig geblieben waren. Und hier ist sie!

Hello everyone!
I had already announced it - the card that I used all those left over shimmery stars on. And here it is!

 Auch diesmal habe ich den Hintergrund mit Distress Ink Stormy Sky, Faded Jeans, Chipped Sapphire und Black Soot gewischt und weiße Acrylfarbe aufgespritzt. 
Und auf der anderen Karte, für die ich die Sterne eigentlich gewerkelt hatte, hatte ich, ohne es zu planen, genau so viele Sterne verwendet, dass die übrigen noch für diese Karte gereicht haben. Hinter der Maus befindet sich ein "Sternenloch" und die komplette fehlende Reihe habe ich hinter dem Hügel, den ich aus schwarzem Cardstock gestanzt habe, versteckt. Den habe ich auch dazu verwendet, um die Karte an das deutsche Format anzupassen. 

Again I used Distress Ink Stormy Sky, Faded Jeans, Chipped Sapphire and Black Soot to ink the background onto a piece of white crdstock, then added splatters of white acrylic paint.
On the other card, that I had made the stars for, I used exactly so many stars - without planing it that way - so the left over stars were just enough for this card. Theres are "star hole" hidden behind the mouse and the complete missing row I've hidden behind the hill, that I die cut from black cardstock. I also used that hill to make the scene a bit longer so it fits a german standard card size.


Die Sterne sind, wie schon erwähnt, mit dem All the Stars Background von MFT aus Cardstock, den ich mit Distress Spirtz Peacock Feathers und Uncharted Mariner besprüht habe, gestanzt. Diesmal habe ich die Sterne mit goldenem Gilding Wax betupf, so passten sie super zum Stern in der Hand der Maus. Ich habe die Sterne mit dünnem 3D Tape hinterlegt und dann in Reihen auf den Hintergrund geklebt. Eine Stelle habe ich dabei freigelassen - das ist der Ort, von dem die Maus gerade den Stern vom Himmel geholt hat. 

The stars, as already mentioned in the previous post, is die cut from a piece of cardstock that I had sprayed with Distress Spritz Peacock Feathers and Uncharted Mariner, using the All the Stars Background die by MFT. This time I dabbed some gold gilding way onto the stars, this way they go great with the star in the mouse's hand.
I backed each star with a piece of thin foam tape and glued them in rows onto the background, leaving a spot empty. This is where the mouse just plucked a star from the sky.


Die Maus ist aus dem Set A Star is Born von ColoradoCraft. Ich fand es einfach super passend, wie die Maus ganz stolz den Stern an sich drückt, als hätte sie ihn gerade mit viel Mühe vom Himmel geholt. Coloriert habe ich sie mit Copics und sie per Hand ausgeschnitten. Den Stern habe ich mit einem klaren Nuvo Shimmer Pen ein wenig beglittert.
Hinter der Maus befindet sich der Big Hugs Circle Frame von MFT, den ich aus Vellum geschnitten habe. 
Und auch das große Congrats unter/vor der Maus ist von MFT. Ich habe es aus irisierendem Vellum gestanzt und von unten mit dem goldenen Gilding Wax betupft. Dann habe ich noch ein kleines "you did it" aus dem Treat Cart Sentiment Add-On von LawnFawn weiß auf schwarzen Cardstock embosst, weiß hinterlegt und dann zusammen mit zwei kleinen weißen Herzen unter das Congrats geklebt. Und dann habe ich mit einem goldenen Gelstift noch eine Art Schatten um das Wort Congrats direkt auf den Hügel gemalt.

The mouse is from the A Star is Born set by CcoloradoCraft. I thought the way she's pressing the star to her breast as if she just plucked it with lots of effort from the sky, was just perfect here. I colored her with Copics and cut her out with my scissors. Onto the star I added some glimmer with a clear Nuvo shimmer pen.
Behind the mouse I placed the Big Hugs Circle Frame by MFT, die cut from vellum.
And also the large congrats under/in front of the mouse is by MFT. I die cut that from iridescent vellum and dabbed some more of the gold gilding wax to the bottom of the word. Then I white heat embossed a "you did it" from the Treat Cart Sentiment Add-On set by LawnFawn onto black cardstock, matted it white and adhered it, together with two white hearts, under the word congrats. I also used a gold gel pen to draw some kind of drop shadow around/under the word congrats, directly onto the black hill.
 

Den Hügel und die Maus habe ich mit dickem 3D Tape hinterlegt. Und am Himmel habe ich dann noch einige goldene Perlen verteilt. Die füllen den Himmel und unterbrechen die geraden Linien ein wenig. Außerdem betonen sie das "Loch" am Himmel noch etwas mehr.
Zum Schluss habe ich dann alles auf einen weißen Kartenrohling geklebt.

The hill and the mouse I backed with thick foam tape. To the sky I added a few gold pearls. Those fill the sky up a bit and interrupt the straight lines. They also make the "whole" in the sky even more noticable.
As the last step I adhered my card panel to a white note card.
 

Freitag, 6. September 2024

You're a star

 
Hallo Ihr Lieben!
Ich bin ja eigentlich nicht der "ich-hebe-jeden-Schipsel-auf"-Typ. Aber wenn es ein kompletter Hintergrund oder Stanzteil ist, dann kann es schon sein, dass ich es gleich auf der nächsten Karte verarbeiten will. Sie in irgendeiner Box zu sammeln klappt bei mir nicht. Entweder nutze ich sie sofort oder sie wandern in den Müll. Hier hatte ich das aus goldenem Metallic Cardstock gestanzte thanks übrig - und das hat dann tatsächlich zu dieser und zwei weiteren Reste-Karten geführt... 

Hello everyon!
I am not the "I-keep-every-leftover-scrap" type of crafter. But when it's a complete background or a die cut, then it can happen that I am going to use it on the next card. I know exactly that I don't need to keep a leftover box - either I use them right away or they will never get used. Here I had the word thanks die cut from gold metallic cardstock left over - and that actually led to this and two more cards using leftovers....

Auf dieser Karte wollte ich eigentlich den All the Stars Background von MFT verwenden und die Sterne in Reih und Glied aufkleben. Damit das einfacher ist, habe ich die Stanze erst benutzt, um die Schneidlinien in ein Stück weißen Cardstock zu drücken. Den habe ich dann mit Distress Ink Stormy Sky, Faded Jeans, Chipped Sapphire und Black Soot eingefärbt. Mit einem Pinsel habe ich weiße Acrylfarbe aufgespritzt.
Dann habe ich mit Glimmerpaste und einem Stencil Strahlen aufgewischt - der Ausgangspunkt liegt im unteren Drittel der Karte, wo später mein Text sein soll. 
Nachdem die Paste trocken war, habe ich meine Pläne über den Haufen geworfen, denn der Hintergrund gefiel mir so gut, dass ich fand, die Sterne würden zu viel davon verdecken.

On this card I wanted to use the All the Stars Background by MFT and glue the stars down in rows. To make that task easier I first used the die to emboss the cutting lines into a piece of white cardstock. Then I inked it with Distress Ink Stormy Sky, Faded Jeans, Chipped Sapphire and Black Soot. Using a brush I splattered on some white acrylic paint.
Then I used a rays stencil and glimmer paste to add rays to the background - the center is in the lower third of the card, where I wanted my text to be later.
After the paste had dried I changed my plans because I really liked the background and thought, the stars would cover too much of it.
 

 Also habe ich erstmal meinen Text aufgeklebt. Der ist mit der Giant Outlined Thanks Stanze von LawnFawn gemacht und besteht aus dem schon erwähten Übrigbleibsel, gestanzt aus matt-goldenem Metallic Cardstock. Außerdem befinden sich dahinter 4 weiße Lagen und die Schattenlagen, die ich zwischen die goldene und die weißen Lagen geklebt habe, habe ich aus Vellum gestanzt. 
Und dann habe ich ganz spontan die süße Maus aus dem Set Dream Big von ColoradoCraft als Motiv benutzt. Und dazu passte dann der kleine "you're a star" aus dem Super Star Set von LawnFawn perfekt. Ich habe ihn mit goldenem Embossingpulver auf schwarzen Cardstock embosst.

So I started with the text. I made that using the Giant Outlined Thanks die by LawnFawn. It's put together from the already mentioned left over die cut from matte gold metallic cardstock and four more white layers, that I backed the gold die cut with. The shadow layer, that I adhered between the gold and the white layers, I cut from vellum.
And then I brought out this cute mouse from the Dream Big set by ColoradoCraft. The little "you're a star" text from the Super Star set by LawnFawn just went perfect with it. I gold heat embossed it onto black cardstock.


Die kleine Maus auf dem Stern habe ich mit Copics coloriert, ausgeschnitten und auf den gestanzten Text gesetzt.
Und dann habe ich doch noch zumindest einige der Sterne an ihrem Platz aufgeklebt. Dafür habe ich erst ein weiteres Stück weißen Cardstocks mit Distress Spritz Peacock Feathers und Uncharted Mariner eingesprüht und nach dem Trocknen daraus die Sterne ausgestanzt. Die Ränder habe ich dann leicht mit dunkeltürkisfarbenem Gilding Wax betont und sie dann auf den Hintergrund geklebt. An die Stelle, auf die die Maus schaut, habe ich einen Stern, den ich aus dem matt-goldenen Metallic Cardstock gestanzt habe, aufgeklebt.
Nunja, Ihr ahnt es vielleicht. Natürlich hatte ich nun jede Menge türkisfarbener Sterne und auch noch das Negativ übrig... Das Negativ habe ich dann für eine meiner Sneak-Karten auf das September-Release von Stampcorner verwendet und Euch bereits gezeigt. Die Karte mit den Sternen folgt dann demnächst...

I colored the little mouse on the star with Copics, cut her out and placed her on top of the die cut text.
And then I added at least a few stars back in their place. So I spritzed another piece of white cardstock with Distress Spritz Peacock Feathers and Uncharted Mariner and die cut the All the Stars Background from it once the cardstock had dried. I dabbed some dark turquoise Gilding Wax onto the stars and adhered them to the background. In the spot the mouse it looking it I added a star that I cut from the matte gold metallic cardstock.
Well, you might already fear it. Of course I had a bunch of turquoise stars and also the negative left over... The negative I used on one of the sneaks for the september release by Stampcorner and already shared that card with you. The card with the stars I will show you in the near future...


Natürlich kam zum Aufkleben der Elemente wieder dünnes 3D Tape zum Einsatz. Und weil der Himmel zwischen den großen Sternen dann doch noch etwas leer wirkte, habe ich einige klar-irisierende Sterne auf der Karte verteilt. Die stechen nicht sofort ins Auge, füllen die Karte aber trotzdem.
Zum Schluss habe ich dann alles - ohne Mattung - auf einen weißen Kartenrohling geklebt. Den breiteren weißen Rand finde ich hier echt klasse - und er ist ein wenig durch die Größe der Hintergrundstanze bedingt, die ja im US-Format gestaltet ist.

Of course I used thin foam tape to adhere the elements. And since the sky looked a bit plain between those large stars I scattered some clear-iridescent star confetti. They don't take a lot of attention but still fill the card.
At the end I glued the card panel - without adding a mat - to a white note card. I love the quite wide white border - and part of the reason why I ended up with it it the american card sized background die.

Mittwoch, 10. April 2024

Eine Karte zur Beförderung

 
Hallo Ihr Lieben!
Ich probiere ja immer, einen Bezug zu meinem Job hier auf meinem Blog zu vermeiden. Aber ich denke, heute oute ich mich doch irgendwie. Das ist eine Karte für einen Kollegen, der befördert wurde. Und das wird natürlich gefeiert.

Hello everyone!
I always try to keep job related things away from my blog. But I guess today everyone will know what I do for a living. This is a card for a co-worker, who was promoted and of course we're celebrating that.

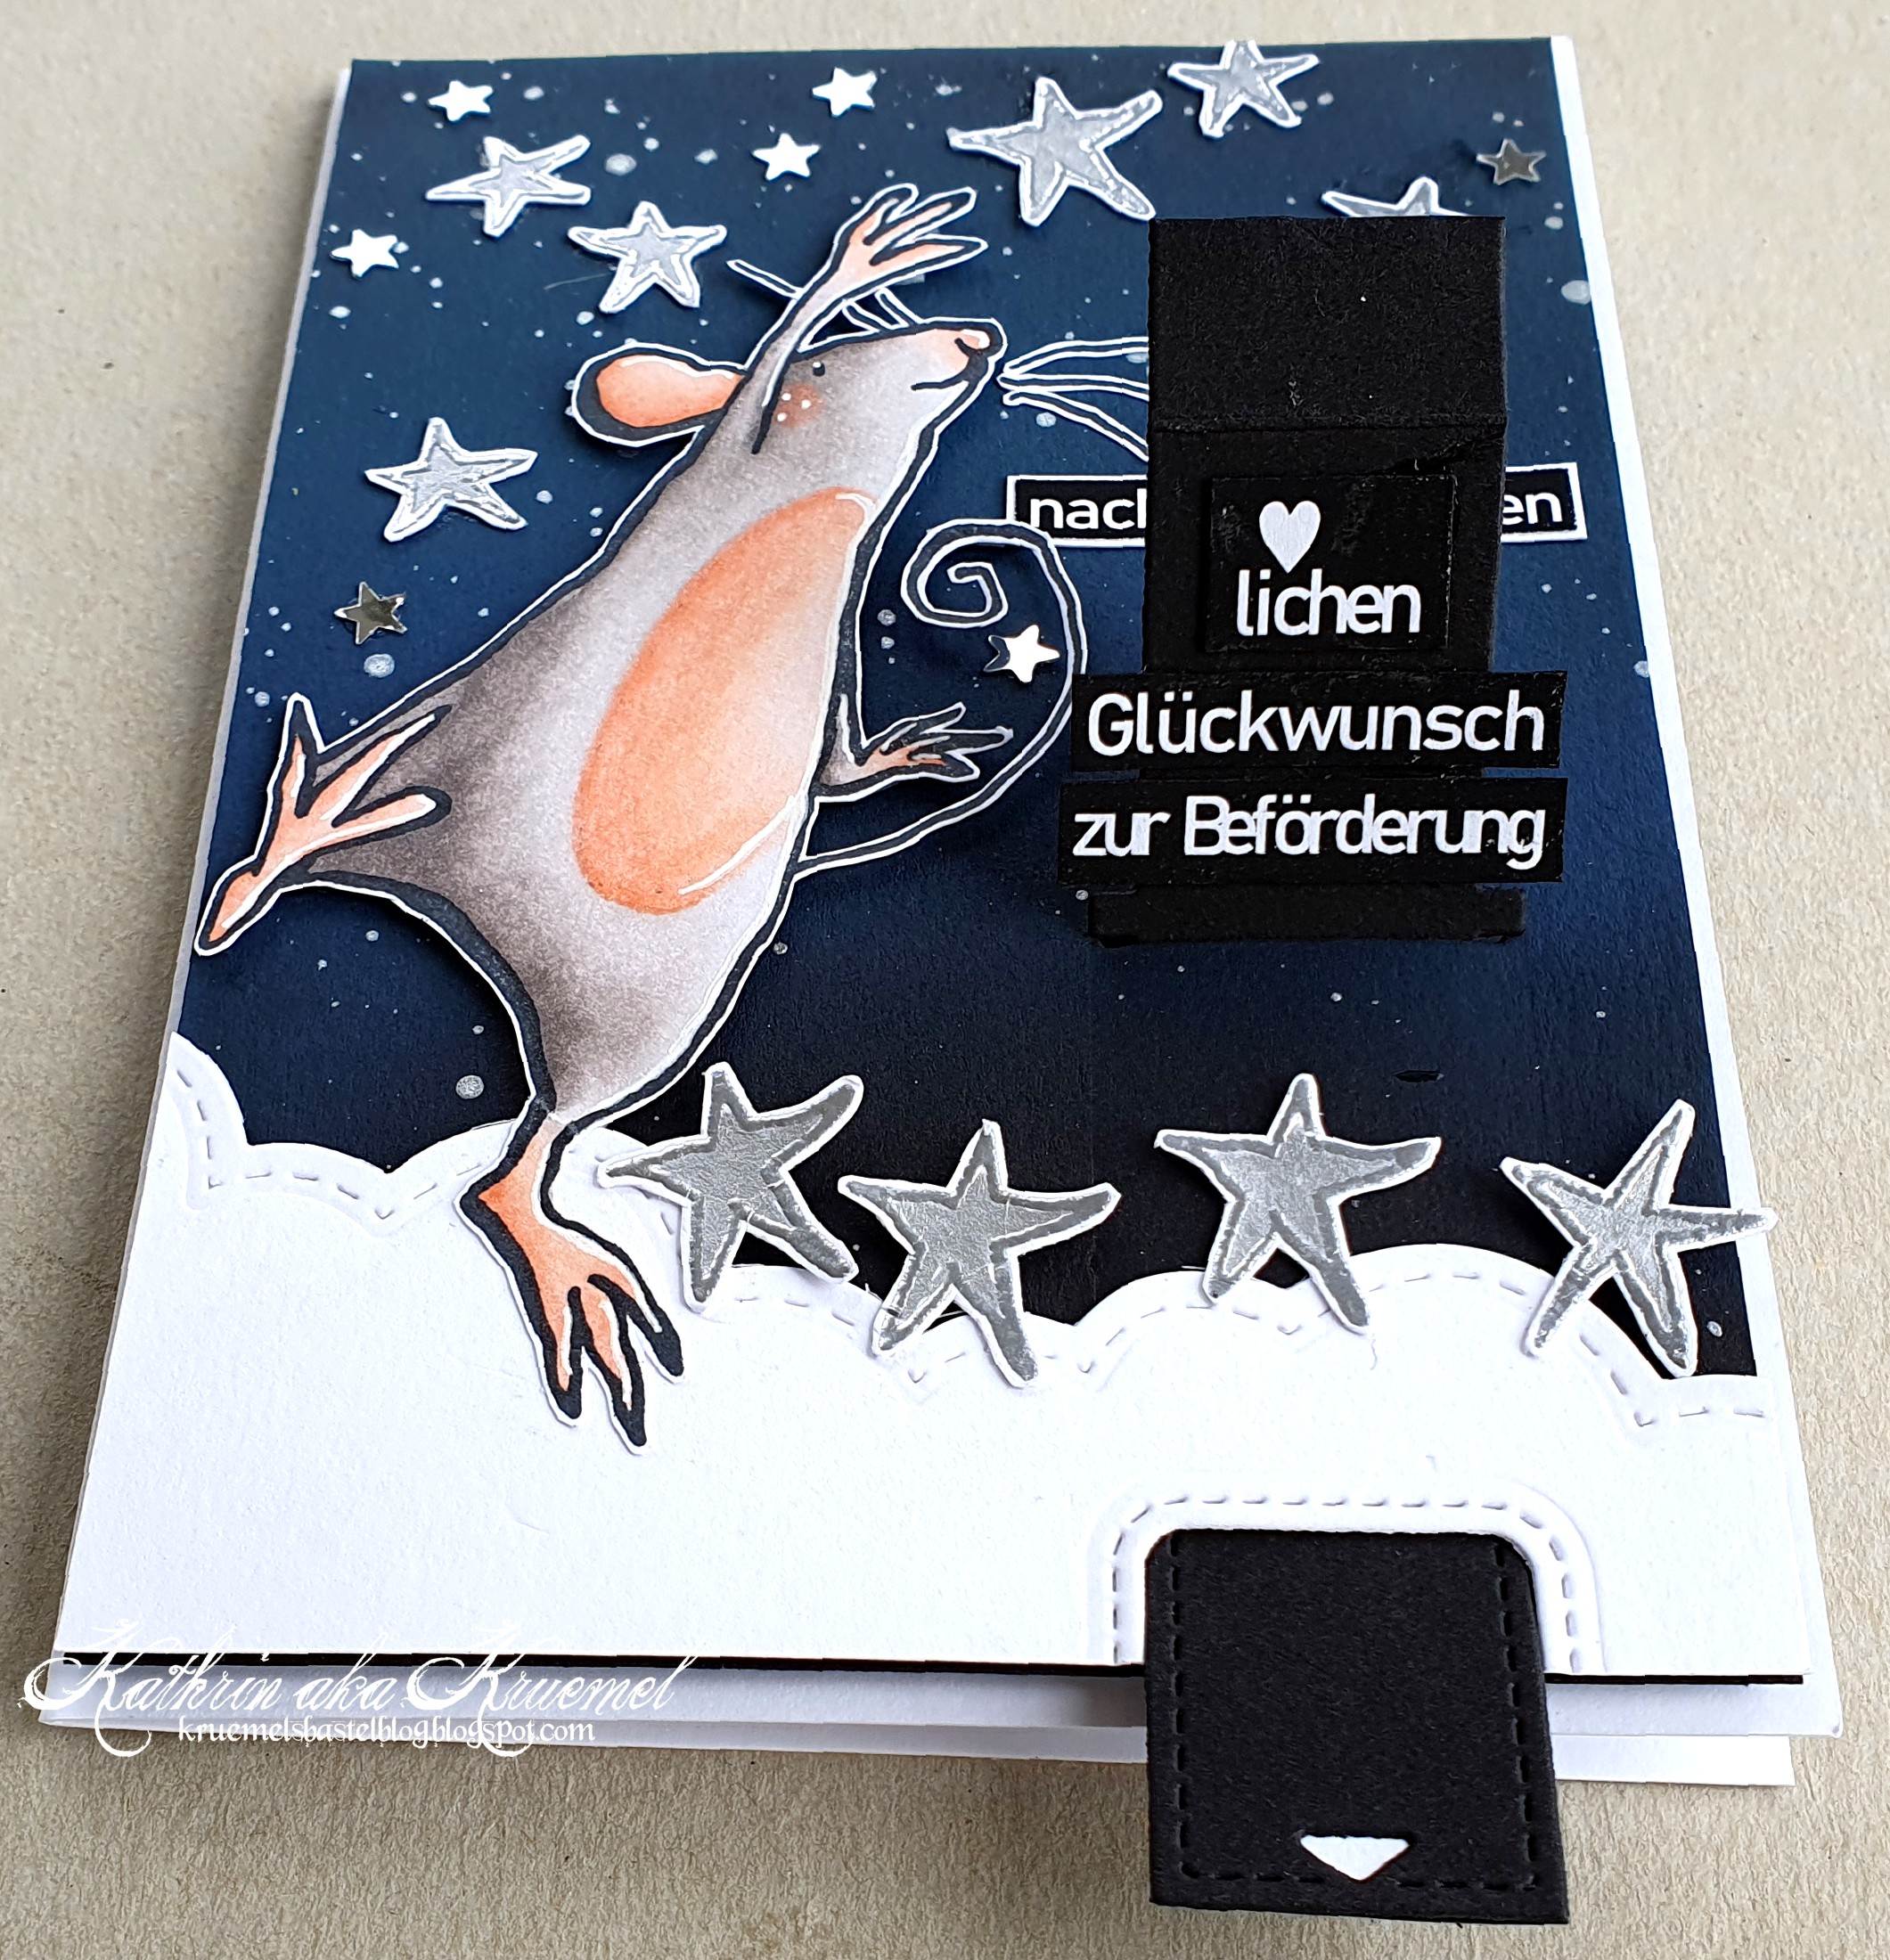
Ich wollte unbedingt eine interaktive Karte machen. Ob der Pull 'n Pop Mechanismus von LawnFawn die glücklichste Lösung war, weiß ich nicht genau, denn der Mechanismus liegt oben auf der Karte auf. Meine andere Idee wäre eine Slider Card gewesen, dann hätte man aber die Form des Sterns gesehen und ich hätte keinen Platz für den versteckten Text, den Ihr später noch seht, gehabt. Also ist es so, wie es jetzt ist, gut und wahrscheinlich bin ich nur einfach mal wieder viel zu selbstkritisch.
Der Hintergrund besteht aus einem Stück schwarzen Cardstocks, den ich von oben her mit Distress Oxide Tumbled Glass, Salty Ocean und Prize Ribbon gewischt habe. Dann habe ich silberne Metallic Watercolor aufgespritzt. So rein farbtechnisch hätte mir ja Gold viel besser gefallen, aber wir wollen ja bei der Realität bleiben.... ;)
Unten auf der Karte habe ich ein Stück weißen Cardstocks aufgeklebt, das ich mit einer Wolken-Bordürenstanze gestanzt habe. Die Maus - bzw. der Mäuserich - konnte ja nicht einfach am Himmel schweben.

I really wanted to make an interactive card. I'm not sure, if this Pull 'n Pop mechanism by LawnFawn was the best option because it lays on top of the card. My other idea was a slider card, but then you'd have seen the shape of the fourth star and I wouldn't have had room for the hidden text, that you'll see a bit later. So I am okay with how the card turned out - and I guess once again I am just way too self-critical.
The background is made from a piece of black cardstock, that I inked from the top with Distress Oxide Tumbled Glass, Salty Ocean and Prize Ribbon. Then I added spatters with silver metallic watercolor. Just as a color combination I would have preferred gold with the blue, but let's keep this card  realistic...! ;)
To the bottom of the card I added a piece of white cardstock that I had cut with a cloud border die. The mouse had to have something to stand on up there in the sky.


Das Motiv ist natürlich unverkennbar von Colorado Craft - und zwar aus dem Stempelset A Star is Born. Ich habe es mit Copics coloriert und ausgeschnitten. Außerdem habe ich Sterne aus diesem Set und aus dem Set Falling Star mit silbernem Embossingpulver auf weißen Cardstock embosst und einfach mit einem silbernen Gelstift ausgemalt, damit sie schön schimmern. 

This image is unmistakable by Colorado Craft - from their A Star is Born set. I colored it with Copics and cut it out. I also heat embossed the stars from this set and the Falling Star set with silver embossing powder onto white cardstock and simply filled them with a silver gel pen to give them a nice shimmer.


Die Maus habe ich auf den Hintergrund geklebt und dann die Sterne am Himmel verteilt. Dazwischen habe ich einige silberne Stern-Konfetti gesetzt. 
Den Text habe ich am PC geschrieben. Ich hatte zwar einen passenden Stempel, der war aber winzig. Also habe ich den Text weiß auf schwarz gedruckt, ausgeschnitten, weiß gemattet und ebenfalls auf den Himmel geklebt.

I adhered the mouse to the background and then added the stars to the sky. Between them I glued down a few silver star confetti.
The text means "reach for the stars". I wanted to have the texts on this card written in german and had it as a stamp, but it was tiny. So I printed it white onto black, cut it out, matted it white and attached it to the sky as well.


Zieht man am Tab unten, klappt der Mechanismus auf und zeigt den zweiten Text auf der Karte. Außerdem ist hier der vierte Stern zu sehen. Rein technisch war es nicht möglich, den letzten Stern in der Reihe zu verstecken - so hätte der Mechanismus nicht funktioniert bzw. ich hätte die Schlitze nicht so nah an den Rand stanzen können. Also ist eben der dritte Stern verdeckt - das Ergebnis zählt schließlich. 
Auch diesen Text habe ich am PC geschrieben, schwarz hinterlegt (damit man in eingeklapptem Cardstock die weiße Rückseite des Papieres nicht sieht) und ihn auf die Klappe geklebt. 
Damit der Mechanismus gut funktioniert, braucht er etwas Platz unter der Karte. Deswegen habe ich den Kartenaufleger mit 3D Tape auf den weißen Kartenrohling geklebt und außerdem die Wolkenbordüre (und somit auch die Maus) mit dünnem 3D Tape befestigt. 

When you pull the tab at the bottom edge of the card it shows the second text on this card, that means "congrats for getting promoted". When the tab is pulled it also reveals the fourth star. Just technically it wasn't able to cover the last star in the row - the mechanism wouldn't have worked/I wouldn't have been able to cut the slits this close to the edge of the card panel. So it's the third star that gets covers - but it's the result, that counts, right?
Also this second text I printed with my computer, glued it onto some black cardstock (to cover the white copy paper so you don't see it when the flap isn't pulled) and attached it to the flap.
To give this mechanism enough room to move, it needs a bit of extra space on the backside. So I used foam tape to adhere the card panel to the white card base. I also used thin foam tape to attach the cloud border and the mouse.